Admin Guide
Overview
The following guide contains all the information and user guides required to set up, maintain and amend your Elite Voice solution. Each section is ordered to mirror that of the Elite Voice Portal to aid in identifying the section you require.
Within each section descriptions of the feature and its benefits are outlined to enable you to determine if this feature is going to meet the requirements of your business before implementing any changes.
Extensions
Extensions are essentially the phone numbers you give to the phones connected to the Elite Voice Platform, which are the extensions of the platform. That is how one phone on the platform can call another and how external calls can be directed to a particular extension etc. Extensions have a wide selection of settings.
Creating New Extensions
***Please note new extensions can only be created on your Elite Voice account if you have available licenses for the extensions. If you need to create a new extension for a new user you will need to contact the sales team first to arrange for the order of a new extension to be raised***
To create extensions:
Browse to your Elite Voice Domain
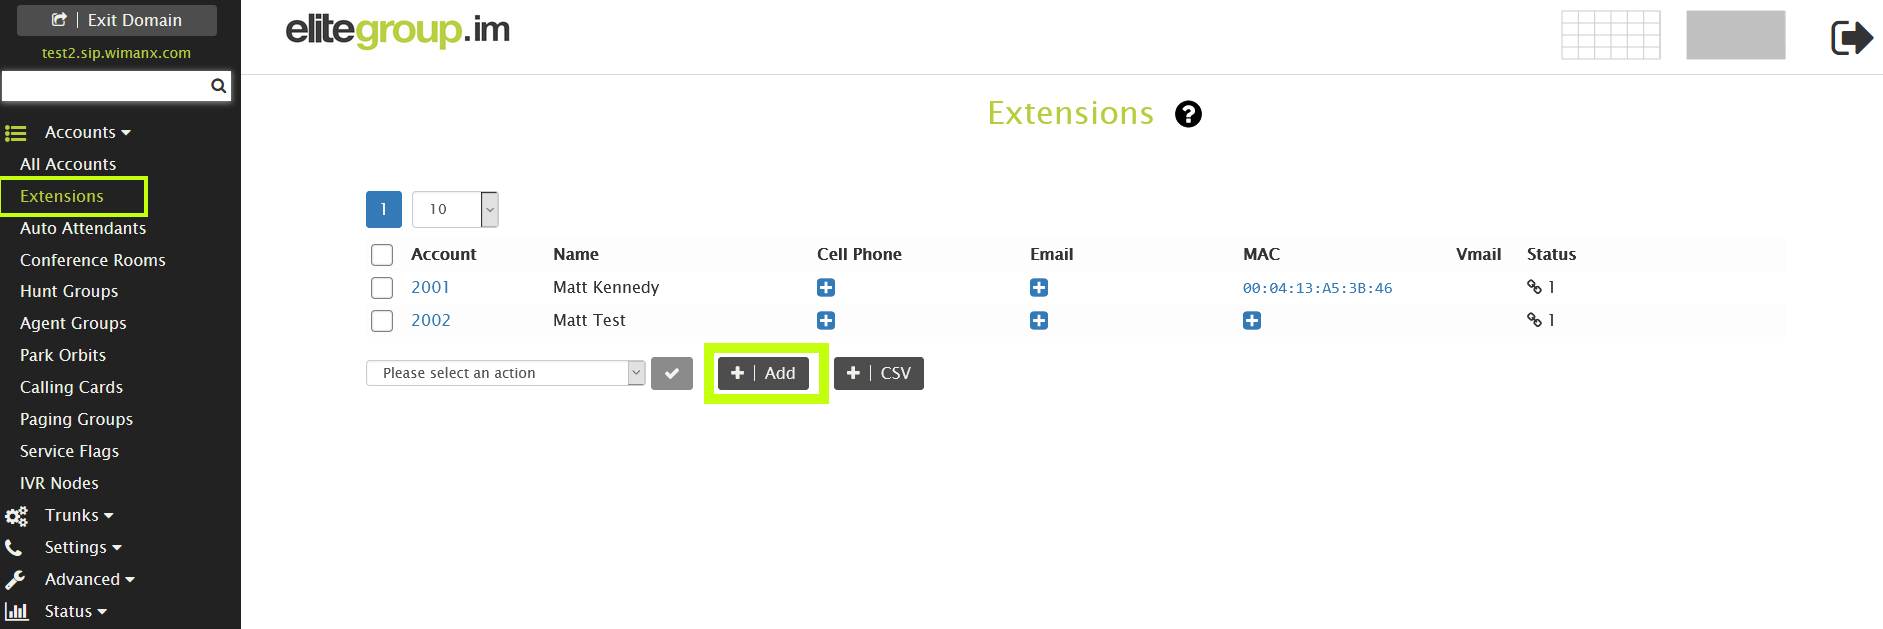
Go to extensions by clicking on Extensions under Accounts as shown above.
Click the tab Add to create new extension(s).
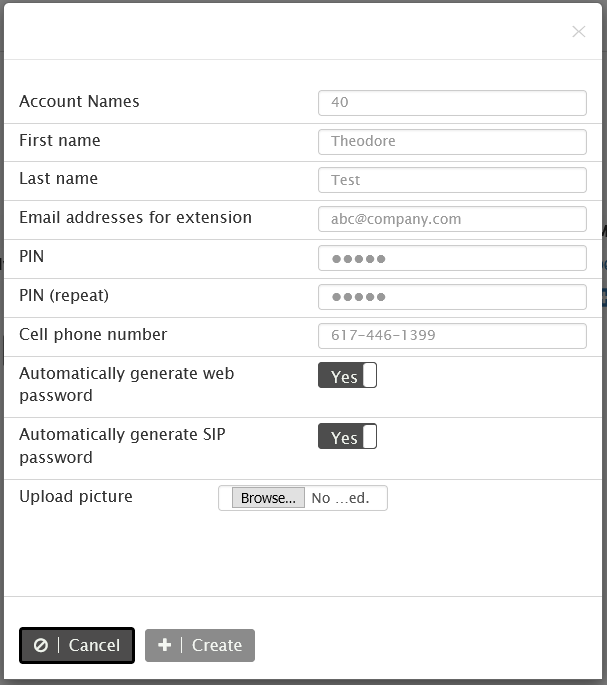
Populate the fields for each of the extensions you want to create using the information shown below:
Account Names: This field takes an extension number and/or alias, i.e., a DID number. When entering DIDs as aliases to an extension number, use the following syntax: 505 01624666666
Note: Extension numbers should range from 2 to 4 digits. The number of digits must correspond to the PnP Dialplan Scheme setting so that the phone will allow the user to enter the required number of digits before it begins processing the call.
First Name, Last Name: The First name and Last name fields will be displayed for all internal and external calls (international characters are permitted).
Email addresses for extension: The email address of the user for the extension can be placed into here. Email addresses can be used for sending voicemail messages automatically, sending notifcations regarding mailbox status and many other functions.
PIN: The PIN is used in several areas of the system (e.g., when a user accesses the voicemail system from another extension or from an outside line, when calling into the system from the cell phone, when using the calling card feature, and when hot desking). When you create extensions, you can leave the PIN field empty and opt to have users set up their own PINs. Once a PIN has been set up, no one other than a user who registers with the extension credentials will be able to go to the mailbox.
PIN (repeat): This is the same as the above desription, however you need to confirm the PIN you have chosen for security reasons.
Cell phone number: The mobile number of the user for the extension can be placed into here. Mobile numbers can be used to forward calls to the user’s mobile number amongst other functions.
Automatically generate web password: This is set to Yes as standard, as this will be the most secure option for the web password. You can set this to No and set your own password, however this is NOT suggested.
Automatically generate SIP password: This is set to Yes as standard, as this will be the most secure option for the SIP password. You can set this to No and set your own password, however this is NOT suggested.
Upload picture: Here you can upload any picture you want associated to the users extension.
Of course, all these settings can also be changed later on after the extension(s) have been created.
Press Create.
The extension(s) will be created which you can see in the “extensions list” or in “all accounts list”, where you can enter each extension just by clicking it, in order to modify it if you want, as explained below.
Configuring an Extension
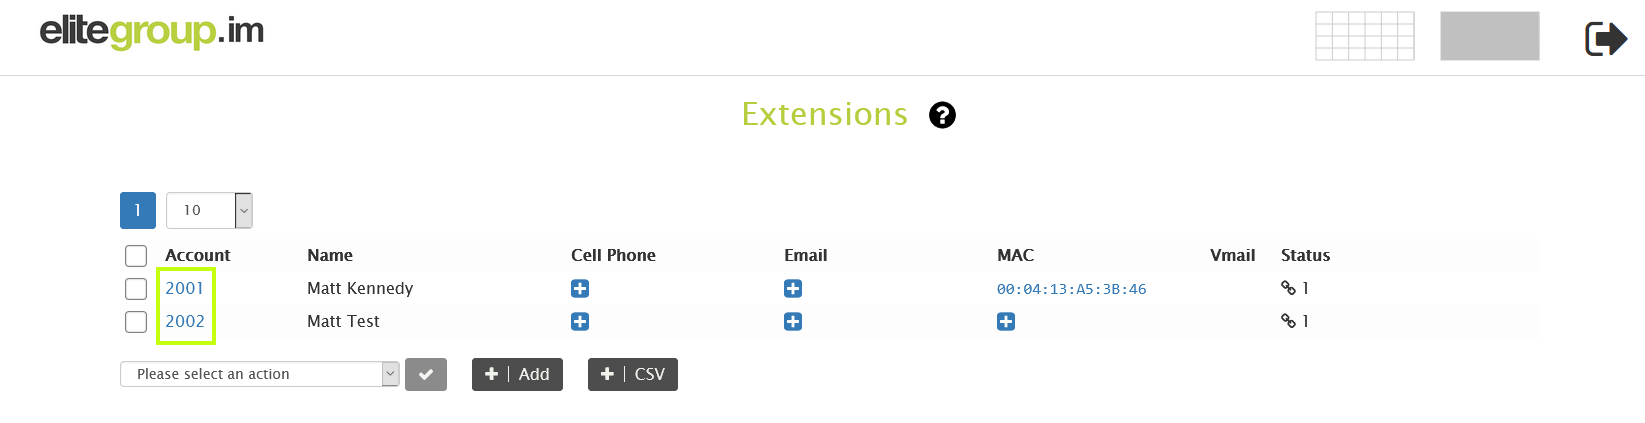

Go to Extensions
Click on any extension from the list that you want to change.
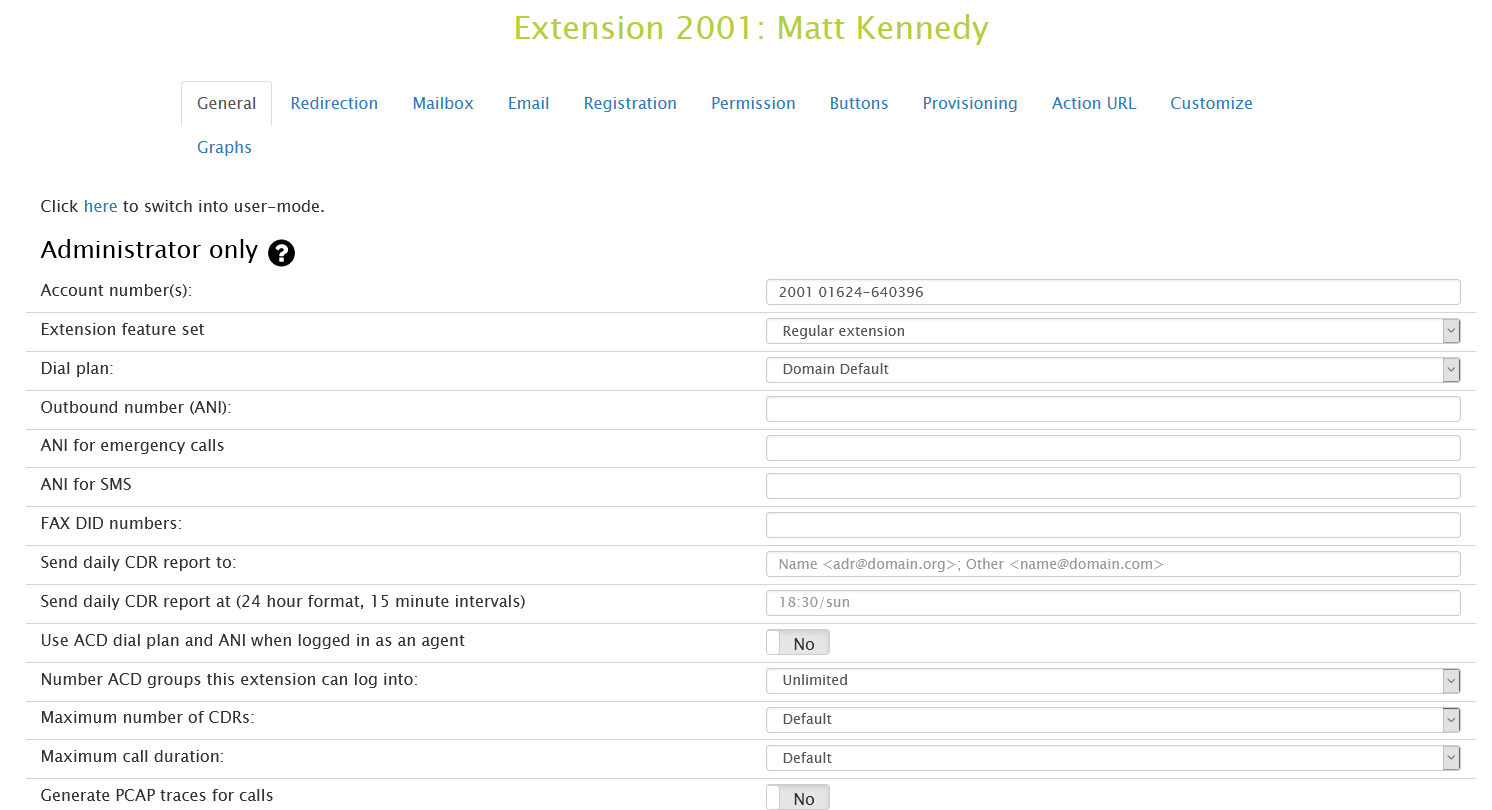
There are many settings divided into tabs:
The General tab has all the general settings of the extension.
The Redirection tab has all settings involving redirection of the extension like DND, call forwarding, cell phone inclusion etc.
The Mailbox tab has all the mailbox settings, including the interface for uploading the greeting audio files, and shows the voicemails of the extension.
The Email tab is for setting up the email address and other email settings of the extension.
The Registration tab is for settings related to registrations for the extension. You may register one or more devices for one extension. When an extension is called, the system will call all registered devices in parallel. The first device that picks the call up will get the call, and the other devices will receive a CANCEL message.
The Permission tab is where you can define what permissions the extension has. The permission to manage the domain should be given only to persons who are authorised to change passwords, create or delete accounts, change dial plans and rates, and so forth. The permissions to jump into calls and listen to conversations may be legally restricted in certain countries. This feature can be completely disabled by the license key for the system. The permission to override DND (Do Not Disturb) is useful for assistant extensions that are responsible for screening calls. Please define the permissions as a list of extensions, separated by space. You may use wildcards, for example “*” to match all extensions of the domain.
The Buttons tab is for setting up the buttons of the device that will register to the extension. Here you can specify which button profile you want to assign to the extension. You may select Automatic which will automatically assign the correct default profile based on the SNOM phone type. Or you may also select any other profile, default or any other profile that you may have created (you can create or change any of the profiles in the Buttons page of the domain). Or you may define an extension-specific profile. If you are using a selected profile (default or otherwise) you may turn this into an extension specific profile by editing it and saving at the bottom of this page.
The Provisioning tab is where you can assign a phone’s MAC address to the extension. This will allow the phone to be automatically configured by the phone system when the extension is opened for MAC based provisioning.
The Action URL tab is for advanced ecent based actions. It is suggested NOT to make any changes within this section.
The Customize tab lets you change the look and feel for this user. It also allows you to change the web pages & phone config templates, etc.
The Graphs tab shows graphs for Calls, Registrations, Registration Changes and Call Quality for that extension.
Explanation of The Different Tabs
Here we will go through some of the tabs available within the extensions.
General Tab
Administrator Only
Account number(s): The extension number is placed in here. (Also the DDI number if applicable)
Extension feature set: This is where you can set what type of extension you would like. The standard feature set is Regular Extension.
Dial plan: Dial plans determine which trunks are used for outbound calls. Dial plans that are available on the domain show up in this dial plan drop down. This should be left as Domain Default if no changes need to be changed.
Outbound Number (ANI): ANI (Automatic Number Identification) is a service that tells the recipient of a telephone call which telephone number made the call.
ANI for emergency calls: When this field is populated, this ANI will serve as the call back number when an emergency number has been dialed.
FAX DID numbers: In this setting you can enter the numbers that should be routed directly to the mailbox as FAX calls. Those numbers must be in the list of account numbers.
Send daily CDR report to: Enter the email address(s) that should receive the CDR report for this extension. Use semicolons between multiple email addresses, since email addresses may contain spaces (e.g., Bob Smith <bs@domain.com>; Joe Bloggs <jb@domain.com>).
Send daily CDR report at (24 hour format, 15 minute intervals): You can enter your prefered time in this field, if you wanted the CDR report to send at 6:30pm, you would place 18:30 into this field.
Use ACD dial plan when logged in as an agent: This setting is useful for agents making outbound calls. When this setting is enabled, the dial plan selected under ACD will be used instead of the dial plan designated for that user’s extension.
Number ACD groups this extension can log into: This setting allows the admin to restrict the number of agent groups the agent can be logged into at any one time.
Maximum number of CDRs: This setting allows the admin to control the number of CDRs that any one user can retain. The admin can also control the accumulative number of CDRs that are stored on the disk (see also the domain’s Maximum number of CDRs setting).
Maximum call duration: As the name suggests, this helps set the time limit allowed on the duration of the call on the extensions. It ranges between one minute to four hours.
Generate PCAP traces for calls: This is set as No for default, do NOT change this. The PCAP traces of the call for troubleshooting could be generated from this level. There is another option under Trunk > VoIP Providers for capturing traces which shows, both the legs of the call, unlike extension level option.
Store syslog messages: This is set as No for default, do NOT change this. The syslog messages capture all of the events from the phone system for troubleshooting.
Account Profile

First name and Last name: These fields will be displayed for all internal and external calls (international characters are permitted).
Position: This field is for the user’s position/job function in the company.
Department: This field is reserved for the department in which the user resides.
Building: This field is reserved for the building in which the user resides.
SIP Password: The SIP password influences the connection between the VoIP phone and the system. Users should not change this password, as it will interfere with access to other registered SIP devices (e.g., soft phone).
Web Password: This password is used to access the PBX web interface. Note: Use a combination of letters and digits and even a symbol to ensure password security. After you’ve entered a new password, the current HTTP session will stay valid until your next login. Permanent cookies will be invalidated on the next login.
PIN: The user’s PIN will be used in several areas of the system (e.g., when accessing their voicemail from an outside phone, when using the calling card account, and when hot desking). For optimum security, users should be required to use at least five digits.
Timezone/Language/Picture
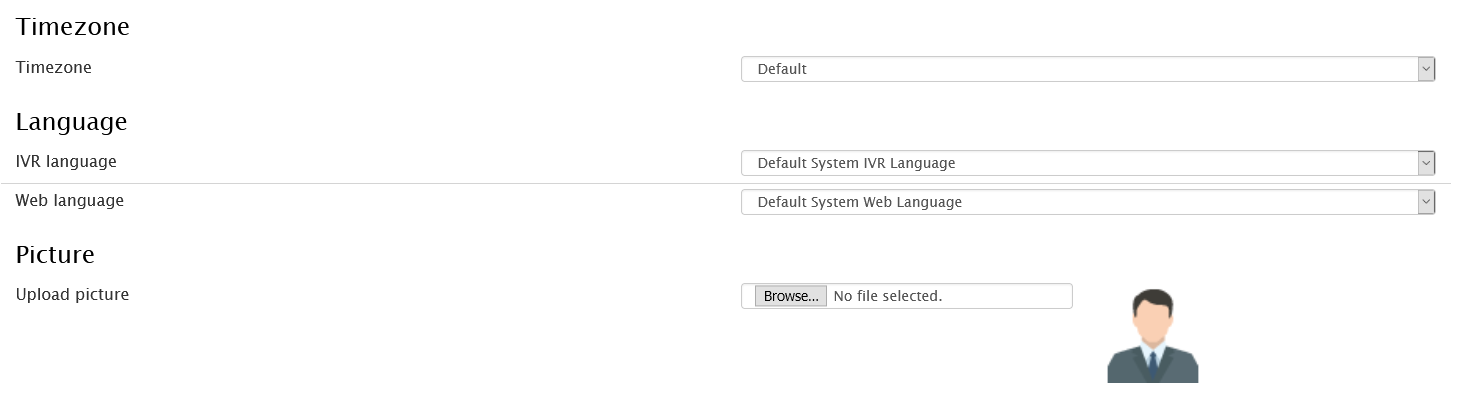
Time zone: This setting tells the system the user’s time zone. It will affect the time stamps of the mailbox and all other time stamps related to the extension. When using the extension from a time zone that differs from the domain’s time zone, users will need to override the domain setting.
IVR Language: This setting controls the language of voice prompts delivered by the system, as well as the language that is displayed on the LCD of the user’s phone. (Callers will not hear the language when calling into the user’s mailbox.)
Web Language: This setting allows users to control the language of the PBX web interface and in the email they receive from the system. Users can override this setting during their initial login to the web interface.
Upload picture: The uploaded picture will be displayed whenever the user calls another extension within the same domain (as long as the other extension has picture-displaying capability). To facilitate easier picture upload during the call setup, users should use a thumbnail image size. The format of the picture depends on phone model. For SNOM 370 phones, use a grayscale BMP image. For models that can display colour photos, use a JPEG image. The system will display the picture on the landing page of the PBX web interface.
Ring tone

Ring melody: This is where you can customise what ringtone you would like, there are some pre-set options in the drop-down box.
From-header: This should be left as default, which is Calling-Party.
Monitoring and Call Pickup
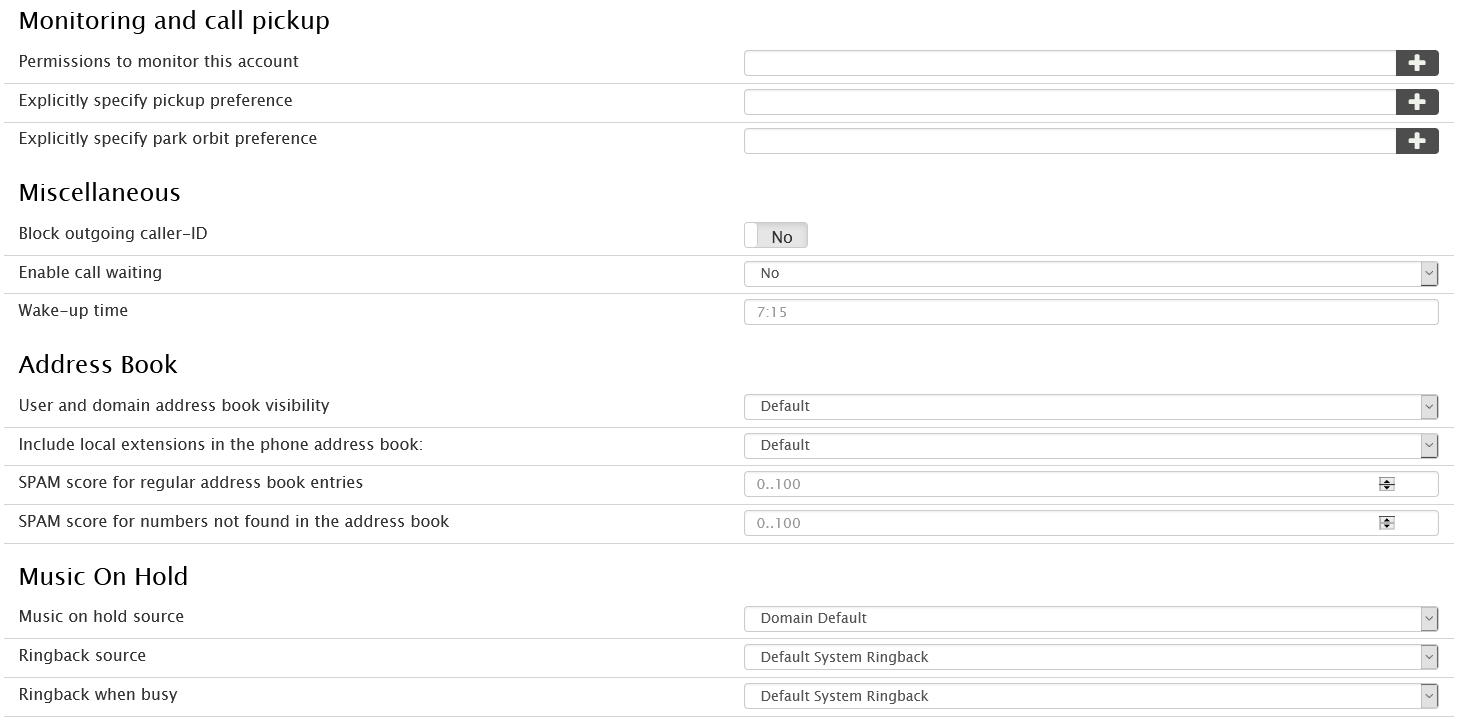
Permissions to monitor this account: This setting defines which extensions may monitor the status of this account, for example with a BLF button. By default, all extensions are permitted to see the status of an account. If you would only like specific extensions to be able to monitor this user, then place the extension numbers into the field, and if you have multiple, then place them into the field with a space between the numbers.
Explicitly specify pickup preference: This setting allows users to specify the accounts that will be picked up when they execute the Call Pickup (*87 default) feature. This setting is especially useful when extensions have been grouped with certain agent groups and hunt groups, as it will prevent the wrong calls from being picked up. If a star (*) is entered into this field, the system will have no preference list to draw from and will require a park orbit number after the *87.
Explicitly specify park orbit preference: This setting allows users to specify a list of park orbits that can be used for parking calls. When park orbits have been entered into this field and the user executes the Call Park (*85) feature, the system chooses the first available orbit. When a star (*) is entered into this field, the system will have no preference list to draw from, and the user will be required to enter the number of the park orbit after entering *85.
Block outgoing caller-ID: This setting allows the user to control whether their caller-ID is shown when making outbound calls.
Enable Call Waiting: This setting allows the user to turn Call Waiting on and off.
Wakeup time: This field allows users to receive automatic wakeup calls from the system. Though this feature is used primarily in hospitality environments, it can also be used on an individual basis. A wakeup call can also be activated using star code *62.
User and domain address book visability: This setting determines which phonebook(s) the user is allowed to see.
Include local extensions in the phone address book: This setting allows users to add extension numbers from the system to their phone.
Spam Score for regular address book entries: This setting must be left blank as it is determined by the Super Admin configuration of the Voice Platform. Changing this setting may cause issues for inbound callers to the extensions.
Spam Score for numbers not found in the address book: This setting must be left blank as it is determined by the Super Admin configuration of the Voice Platform. Changing this setting may cause issues for inbound callers to the extensions.
Music on Hold: This is the extension level music on hold feature which takes precedence over the one set in Domain level, given that various wav files are uploaded in the domain to be used here.
Redirection
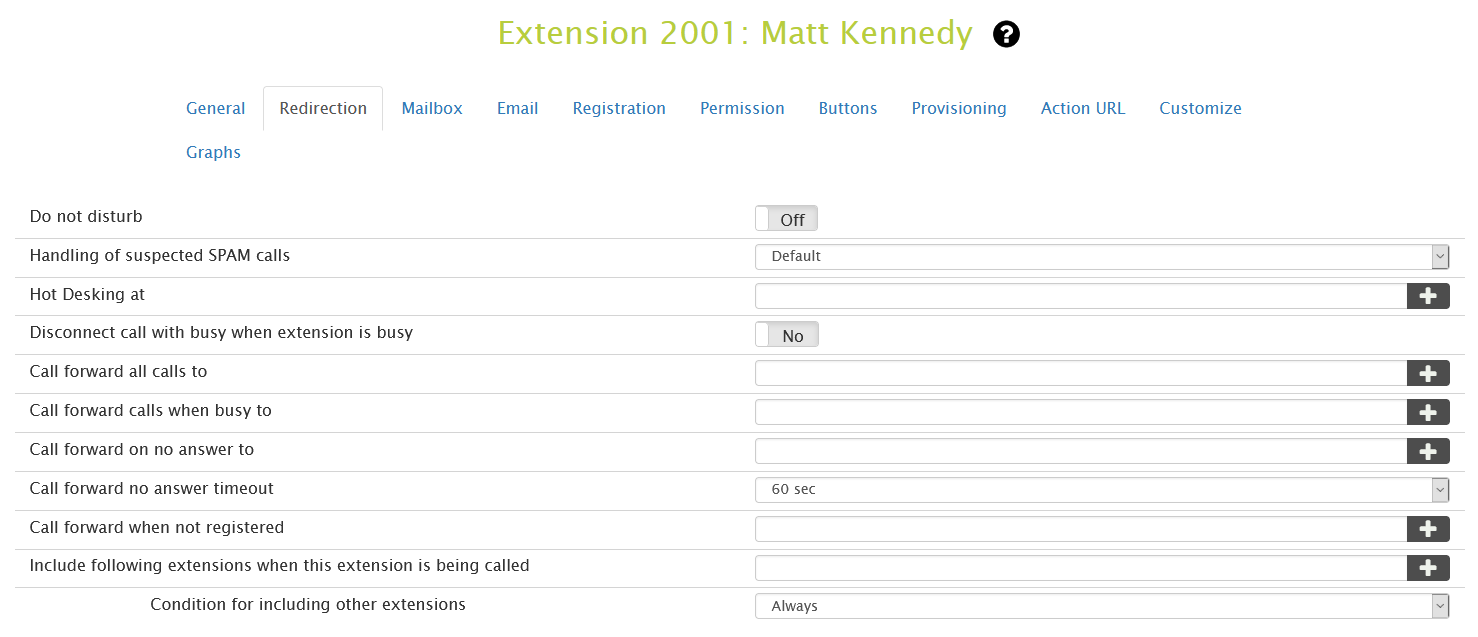
Do not disturb: This setting allows users to tell the system to leave their phone silent for all calls, both internal and external, and even calls from the hunt group. Only extensions with permission to override DND will be able to call the extension. DND override is an administrator setting. An extension on DND can place outbound calls at all times. You can also set DND using the *78 star code.
Handling of Suspected SPAM Calls: This setting allows you to determine how to handle SPAM calls identified by the platform.
Hot Desking at: This setting allows users to specify an extension where they will pick up their calls. All calls (including calls from an agent group or hunt group) will be sent to this extension. For more information on hot desking see Call Forwarding Codes.
Disconnect call with busy when extension is busy A radio button option to simply disconnect the call when extension is busy.
Forward all calls to: This setting allows users to redirect all calls to another extension. Only calls that are headed directly to the user’s extension will be affected by this setting. If a user is part of a hunt group, agent group, or paging group, calls originating from these groups will not be redirected.
Forward calls when busy to: This setting allows users to forward all calls to the extension that is specified, only when the extension is busy. This condition is true if either the phone itself signals that it is busy or if the lines parameter has been set for the extension and this number has been reached. If this settings contains the word “busy”, the system will not redirect the setting, instead attempt to send a busy signal to the caller if the call was not already connected.
Forward on no answer to: This setting allows users to redirect all calls after there has been no answer for a predefined period. The waiting period is defined in the domain but can be overridden by the Call forward no answer timeout setting (next bullet item). (If the mailbox picks up earlier, this setting will have no effect; if the call is redirected, the mailbox timeout will be cancelled.)
Forward on no answer timeout: This setting determines how long the system will wait for the user to answer the phone before forwarding the call (default is 10 seconds). This field is effective only if the Call forward on no answer field has been set.
Forward when not registered: This setting allows the user to specify where calls will be forwarded if the user’s extension is no longer registered for any reason. If the user is part of a hunt group, agent group, or paging group, calls originating from these groups will not be redirected.
Mailbox
Every extension has a voice mailbox on the system; however, the administrator can disable users mailboxes and use an external mailbox, such as Microsoft Exchange. This section applies only to the voice mailbox of the system. This tab has all the mailbox settings, including interface for uploading the greeting audio files, and shows the voicemails of the extension.
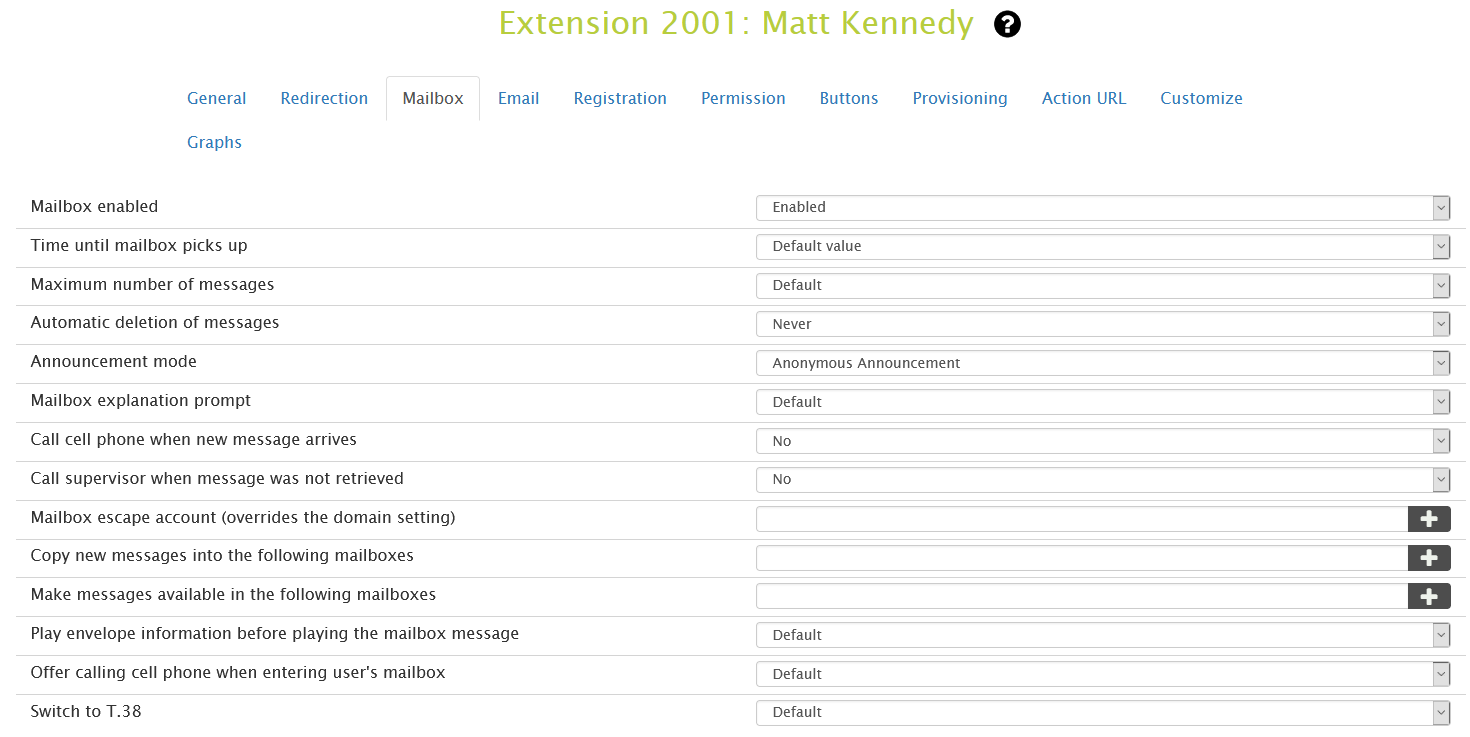
Mailbox Enabled: From this setting, users can enable or disable their voice mailbox. If it is disabled, callers will not be able to leave messages and the user will be unable to use the mailbox functions. If FAX is selected, this mailbox will not play any announcement and instead wait for the FAX signal (available from version 5.0.3).
Time until mailbox picks up: This setting allows users to specify how long the system should wait before redirecting calls to the user’s voicemail. If Call forward no answer timeout has been set, the shorter timeout will be executed first. If Include the cell phone in calls to extension has been set (see Redirection settings), the system must be given enough time to call the user’s cell phone (which may take 10 or more seconds) and enough time for the user to view the caller-ID. The default is 20 seconds.
Maximum number of messages: This setting allows the user to specify the maximum number of voicemail messages that should be stored at any one time. If the maximum has been reached and a caller wants to leave a new voicemail message, the system will attempt to delete a saved message. If space is still unavailable, the system will inform the caller that the mailbox is full.
Automatic deletion of messages: Drop down menu with options on how long to keep messages in voicemail box.
Announcement Mode: From this setting, users can choose an announcement that callers will hear when reaching their extension.
- Anonymous Announcement: The caller will hear the number of the extension.
- Name Announcement: The caller will hear the recorded name of the extension, if one is available.
Mailbox Explanation Prompt: This prompt gets played when a voicemail is left for an extension. But that can be modified using 3 drop down options under this setting:
- Default: This setting plays the Mailbox Explanation Prompt by default.
- Always: The Mailbox Explanation Prompt will always play, whether or not the Greeting is set for that mailbox.
- Not on Personal Greetings: If there has been a personal greeting uploaded and selected from the files section, then those will play when someone reaches the callers mailbox and not the Mailbox Explanation Prompt.
Call cell phone when new message arrives: If users have decided against forwarding their calls to their cell phone but still want to be alerted when a new message arrives on their extension, they can activate this feature. Once a caller has left a message, the system will call the user on the cell phone. After the announcement, the user must press 1 to hear the message. If the message could not be delivered, the PBX will retry up to three times.
Call supervisor when message was not retrieved: This setting will call the give senior / mentor / manager if the voicemail is left on this extension which wasn’t heard / acknowledged within any of the specified times given in the drop-down option.
Mailbox Escape Account (overrides domain setting): This setting gives users the option of changing the direction that a call will take once the caller presses 0 to speak with the operator. The extension that is entered into this field will receive the calls that the user thinks are directed to the operator.
Copy new messages into the following mailboxes: This setting and the next setting (Make messages available in the following mailboxes) allow users to create group mailboxes. A group mailbox can be used for anything from a joint boss/secretary mailbox to a place to collect after-hours calls or holiday calls. All parties will be notified of incoming messages by the MWI that is located on their individual phone (see MWI). Users can listen to the messages from their voice mailbox from an outside phone or an outside line on their own phone for instructions on accessing voicemail from an outside phone). When messages are copied in contrast to be made available, operations like delete the message and mark the message as urgent only affect the copy of the message, not the original message.
Make messages available in the following mailboxes: Like the previous setting (Copy new messages into the following mailboxes), this setting can be used to establish group mailboxes. However, when someone deletes the message or marks it as read, all copies of the message are affected. This makes sense for mailboxes that require a onetime response, for example when a customer calls into a group and wants to receive a call back.
Play envelope information before playing the mailbox message This setting allows the user to listen to the details of each voicemail message (for example: time and extension number of the caller) before hearing the actual message, when the user calls their own voicemail. This setting on the extension level overrides the one on the Domain level. (Domain > Features > Voicemail)
Offer calling cell phone when entering user’s mailbox: Before entering the mailbox, this option gives a choice of calling the users cell phone before leaving them a voicemail.
The email settings on this tab allow users to receive emails as notification of all incoming calls on their extension. Users can also request an audio file, or WAV file, of voicemail that has been left on their extension.
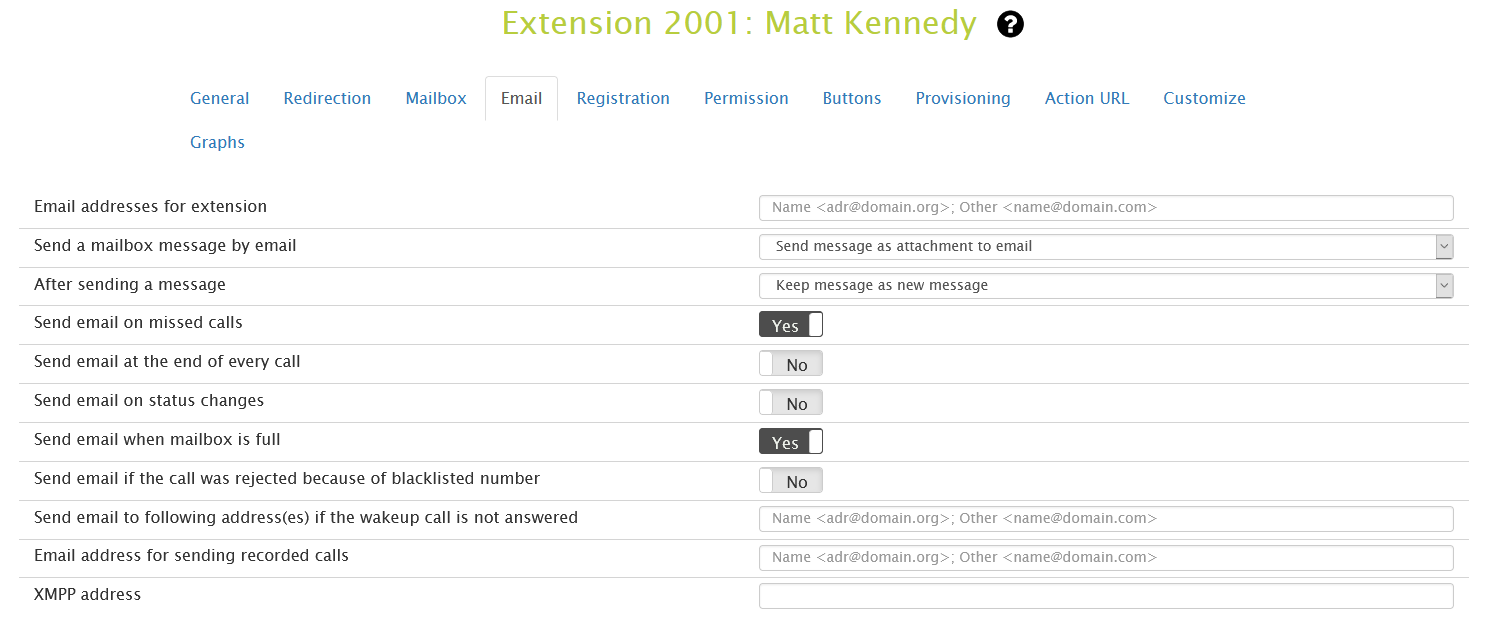
Email Address (e.g. abc@company.com): This feature allows users to integrate their email account with their extension account. Voicemail messages will be sent to the user’s email account according to the settings chosen below (a semicolon is required when entering multiple email addresses into this field).
Send a mailbox message by email
- Do not send an email: No email will be sent. This option should be used when the user prefers to use only the phone to receive voicemail messages.
- Send emails without attachments: Email notifications will be sent to the user for every voicemail that is received. This provides somewhat of a visual voice mailbox. The user will see the name and number of the caller and the date and time that the call arrived. To retrieve the voicemail itself, the user will need to call into the voicemail. The benefit of this mode is that emails that are relatively short can easily be read using mobile devices that support reading emails.
- Send message as an attachment to the email: The user’s actual voicemails will be attached to the email notifications. This option should be selected if email is being used throughout the day and a personal computer is being used to process the email.
After sending a message: This setting allows users to decide what to do with a voicemail message after it has been emailed to them:
- Keep message as new message: The message will remain in the user’s mailbox as a new message. This option has the potential danger of eventually overfilling the voice mailbox. Administrators can use the Voicemail Size setting to restrict the number of voicemail messages.
- Mark message as read: The message will remain in the user’s mailbox, but the system will drop the oldest message to make room for new messages if the mailbox becomes full. The disadvantage of this mode is that the message waiting indicator will not alert the user of new messages.
- Delete the message: The message will be deleted after the email has been sent. This keeps the mailbox clean, but because the system does not store voicemail messages permanently, the user will need to listen to the messages from the email client.
Send email on missed calls:
When this setting has been activated, the system sends the user an email for each missed call. Calls to a hunt group or agent group are not included.
Send email at the end of every call:
When this setting is activated, the system sends the user an email for all calls. This feature is useful for keeping track of a group sales extension, a telemarketing campaign, or calls made to a new employee’s extension. (When both “missed calls” and “all calls” have been activated, the user will receive two emails for each missed call.)
Send email on status changes:
The user will be notified of all status changes (e.g., toggling the DND status, changing the registration status, etc.).
Send email when mailbox is full
The user will be notified when the mailbox is full, which helps them to not loose any voicemails in near future.
Send emails if the call was rejected because of blacklisted number
The user will be notified via e-mail if blacklisted number tries to call them anytime.
Send email to following address(es) if the wakeup call is not answered If, according to the wakeup time call set here search for “wakeup” the user doesn’t answer the call, immediately an email is sent to the address(es) listed in here. Multiple addresses are set with a semicolon between them.
Registration
The registration tab is used to control the registrations for the account. You may register one or more devices for one extension. When an extension is called, the system will call all registered extensions in parallel. The first extension that picks the call up will get the call, and the other extensions will receive a CANCEL message.

Trusted IP Addresses: This setting dictates which IP address or addresses can be registered to this extension. The system will accept registrations only from the specified IP addresses. For example, if the extension has been set to 192.168.1.2, and 192.168.1.5 tries to register, it will be denied with a 403 forbidden message. Use a space as a separator when entering multiple IP addresses. To indicate subnets, use a slash and the number of significant bits behind it (e.g., 192.168.2.0/24). Please note that the PBX will not check the password if the IP address matches.
EPID: Endpoint Identifier is a random number created by the system and functions as a callback number. The EPID is sent on all 911 calls, enabling the PSAP to call the extension back directly if the phone is disconnected or the person hangs up. The EPID is essentially a DID for that extension and ensures that a returned call will reach the extension from which the call originated even if there is an auto attendant in the middle. This works to enable 911’s E911 service. A general callback number for all users across the domain can also be set using the ANI for emergency (See also Emergency Destination Number on this page, and the Emergency Numbers settings.)
Lines: The lines parameter is used during provisioning to tell the phone how many line keys it should allocate (whenever applicable). The line feature is also used to restrict the number of calls that an extension can make. For example, if 1 is used in this field, then calls cannot be made simultaneously from both the office phone and the home office phone. During an active call, the system will neither page the extension nor perform intercom calls to that extension.
number of concurrent registrations per extensions: This setting is used to restrict the number of phones that can be registered to an extension. This is useful for service providers or enterprises that want to ensure only one phone is registered per extension.
Credit for outbound calls: This setting allows you to place a limit on outbound calling for the extension only. You can also place a limit on outbound calling at the domain level settings.
Override Codec Preference: This setting allows you to specify the codec preference for the extension. This setting is useful for a remote phone with limited bandwidth, as you can force a low bit rate codec like GSM or G.729 to be used on the extension. The format for this setting is similar to the Port Setup section of the system.
Emergency Destination Number: This setting is used when you are running the extension in a remote location where a different police department should be called. You will need to find the Public Safety Answering Point (PSAP) for this number; however, it is not a guarantee that a call will be routed there, so ensure that this is tested or approved if your carrier does not have 911 service. Once this setting has been populated, the number entered into this field will be dialled once a user dials an emergency number configured in the Emergency Numbers
Log Registration Changes: This setting allows the domain administrator to specify a log level for registration log messages specifically for the extension. This setting makes tracking down registration problems easier. You can also decide who should receive an email when the registration status does change—the administrator, the user, or both.
Current Registrations
Displayed at the bottom of the Registrations page are the current registrations (if any exist) for the account.
Important information includes the type of registration, the registered contact address (as indicated in the registration message), and the length of time the contact has been registered. “REGISTER” in the Type field indicates a standard registration for receiving calls. Other registrations address specific event types, like message waiting indications.
Clearing registrations: To clear all registrations, use the link at the bottom the page. Be sure to refresh the registration from the user agent so that you are able to call it.
Sending a reboot request: You may also send a reboot request to the phone by clicking the check sync link. This way, you don’t have to use the web interface of the device or even go to the phone to reboot it (for example, to read new configuration data).
Manual registrations: You can also add a registration manually. Manual registrations are useful for devices like Microsoft speech server that do not support registrations.
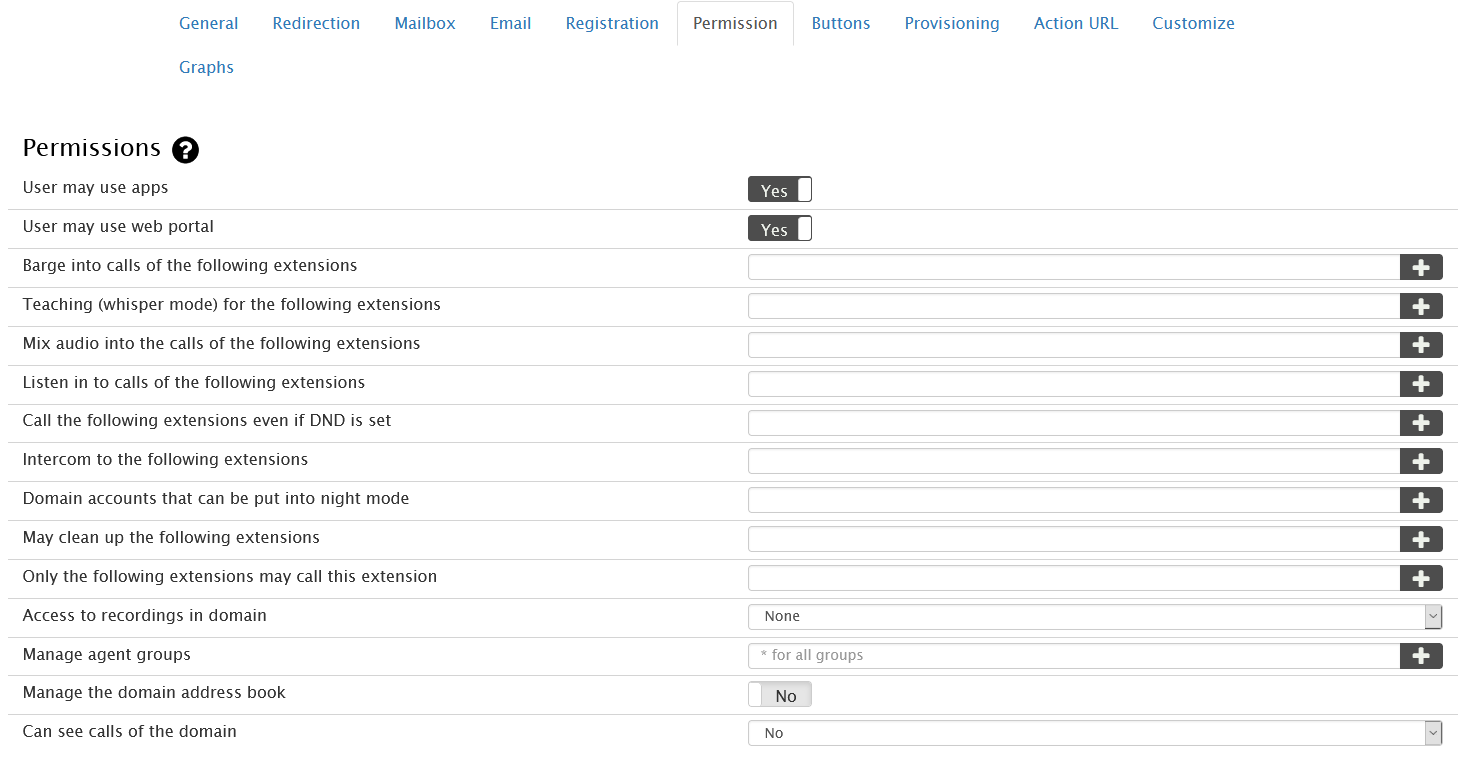
Permission settings allow administrators to define which features the extension can use. The permissions to jump into calls and listen to conversations may be legally restricted in certain countries, so use extra caution here. The permission to override DND is useful for assistant extensions that are responsible for screening calls.
Note: When entering extensions in this section, use a space as a separator if specifying multiple extensions. You may use wildcards, for example, an asterisk (*), to match all extensions of the domain.
Barge into calls of the following extensions: Call Barge-in allows a third party to barge into an in-process call. Typically, this third person is either a secretary contacting the boss or possibly a co-worker in the next cube who needs help on a call. The permissions to jump into calls and listen to conversations may be legally restricted in certain countries; please use extra caution here. Once permission has been set, Call Barge-in can be activated using the *81 star code.
Teaching (whisper mode) for the following extensions: Call Teach mode allows a third party on a line with only one of the parties knowing. This is typically useful in a call centre when a trainer wants to offer tips to a new agent without the customer knowing. Once permission has been set, Call Teach can be activated using the *82 star code.
Mix audio into the calls of the following extensions: This mode allows the extension to mix audio into conversations without receiving the audio stream.
Listen in on calls of the following extensions: In Listen-In mode, a third party can listen in without being detected. The two parties speaking to each other are not aware of the listen-in. Users with permission to use Listen-in can activate it using the *83 star code.
Call the following extensions even if DND is set: If this flag is set, the account will be permitted to call the extension indicated in this field, even if that extension is currently on DND. This applies only to DND which has been set on the system. The permission to override DND is useful for extensions being used by assistants who are responsible for screening calls.
Intercom to the following extensions: This feature is used for communicating with one other person. The two parties must each have their own extension number. (Intercom will not work between two phones that are registered to the same extension.) Users with permission to intercom can activate it using the *90 star code.
Domain accounts that can be put into night mode: This feature enables users to forward domain accounts (e.g., auto attendant, hunt group, etc.) to their own extension. Domain accounts that are entered into this field can be put into night mode by this user. Star code *80 is used to activate this feature.
May clean up the following extensions: This feature enables an extension to clean up other extensions and is useful in a hotel implementation where voicemail must be cleaned out and greetings reset. Star code *84 is used to activate this feature.
Only the following extensions may call this extension: This feature can be used to limit the users who can call another user’s extension.
Buttons
This tab is for setting up the buttons of the device that will register to this extension. Here you can specify which button profile you want to assign to the extension. You may select Automatic which will automatically assign the correct default profile based on the snom phone type.
Or you may also select any other profile, default or any other profile that you may have created (you can create or change any of the profiles in the Buttons page of the domain). Or you may define an extension-specific profile. If you are using a selected profile (default or otherwise) you may turn this into an extension specific profile by editing it and saving at the bottom of this page.
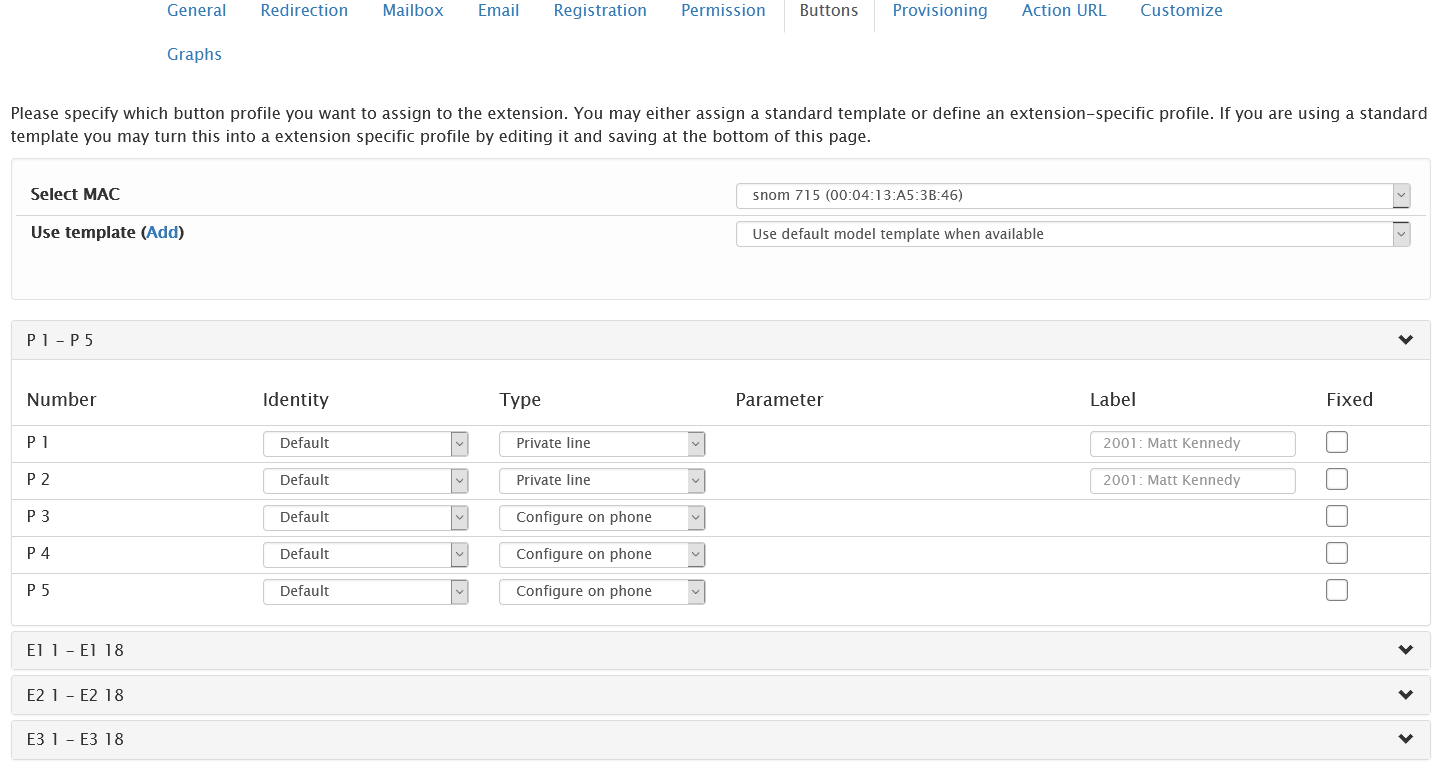
There is also a useful document developed within our knowledge base that be downloaded and used to create button templates and upload directly to the System. this document can be found here
Auto Attendants
The auto attendant functions like a virtual receptionist, connecting incoming calls to extensions and other devices that have been configured to the system. The auto attendant often announces a company’s name, followed by a selection of dialing options. A typical welcome message might be “Thank you for calling Company ABC, “for Sales, press 1” “for Support, press 2” “Accounting, press 3” and “for the dial-by-name directory, press 4”. Callers press the number that corresponds with their selection and are directed accordingly.
Create an Auto Attendant
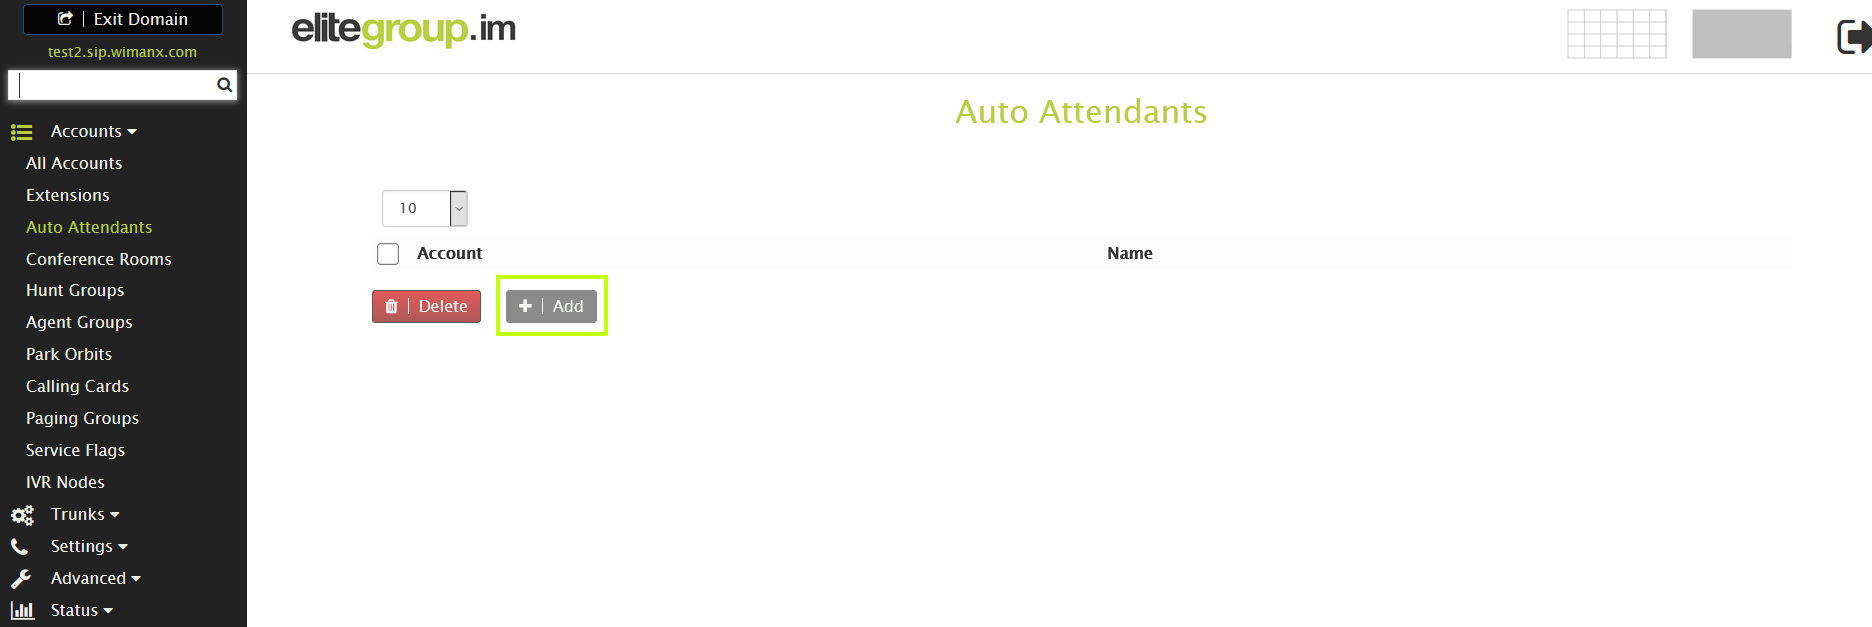
Go to auto attendants by clicking on Auto Attendants under Accounts as shown above.
Click the “Add” button as shown above
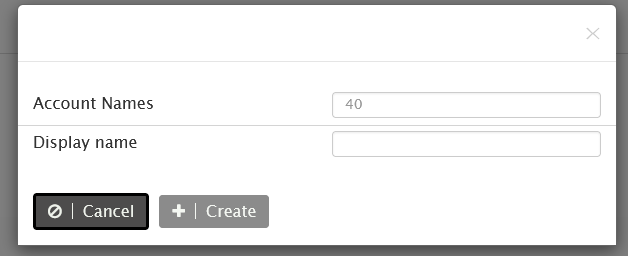
In the Account Names field, enter an extension number and/or a Direct dial if this attendant is going to be where inbound calls first terminate to.
In The Display Name give the attendant a name that makes it easier to identify
Press Create.
The Auto Attendant will be created which you can see in the Auto Attendant list or in All Accounts list, where you can enter each auto attendant just by clicking it, in order to modify.
Configuring an Auto Attendant
Go to Auto Attendants.
Click on any auto attendant from the list that you want to change. Here you can configure settings
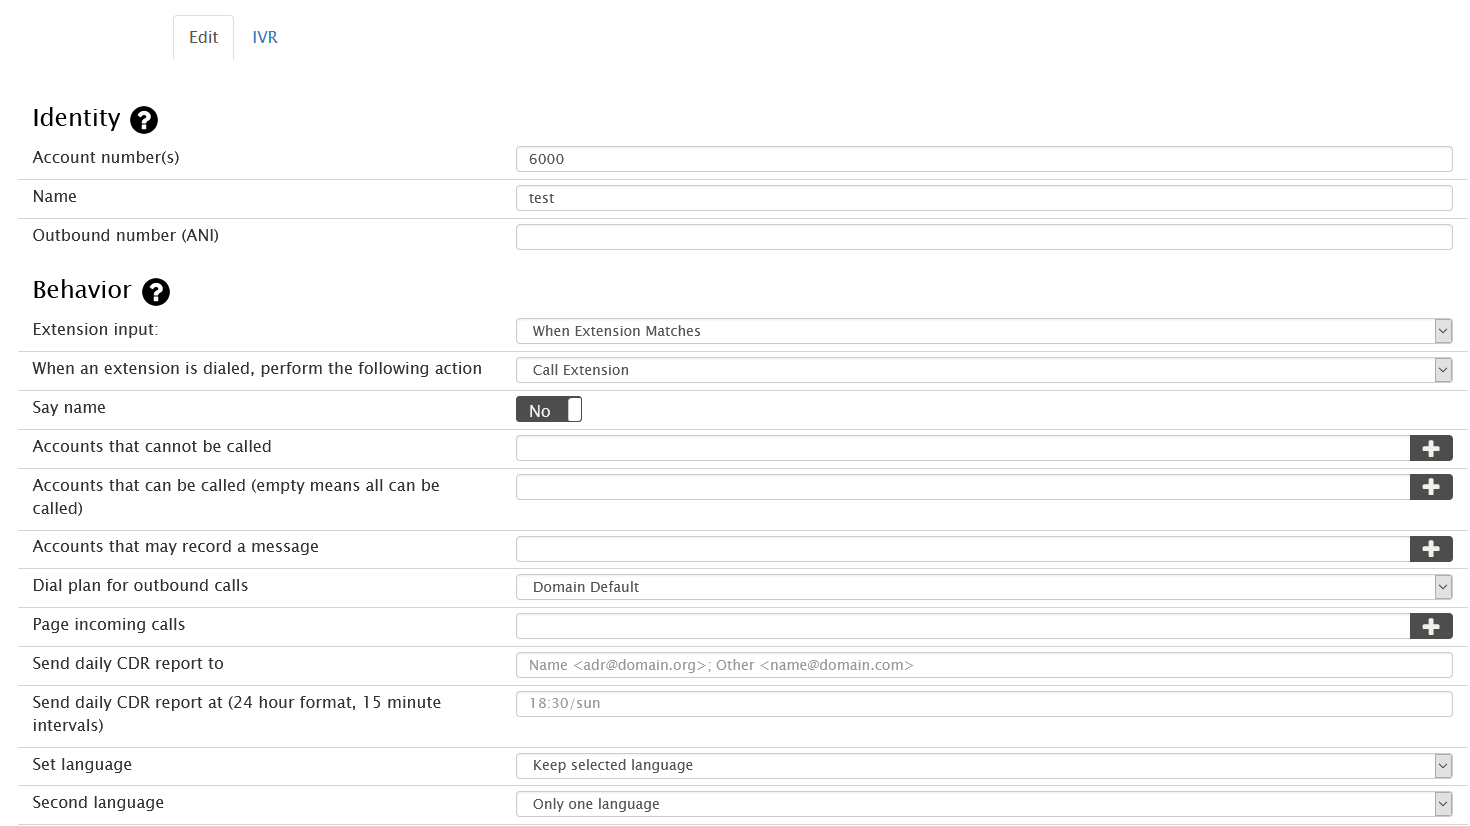
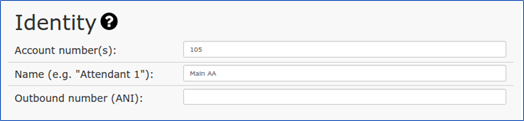
Identity
Account Number(s): This field takes extension number(s) and/or DID number(s). The number of DIDs that can be entered into this field is unlimited.
Name: This field allows you to create an alias so that you can quickly identify the Account among other Accounts. For example, when creating aliases for an auto attendant, you might use the names Day Auto Attendant and Night Auto Attendant to distinguish the auto attendants from one another.
Behaviour
Behaviour settings allow you to specify a wide range of settings, e.g., dial-by-name settings, recording settings, and monitoring settings.
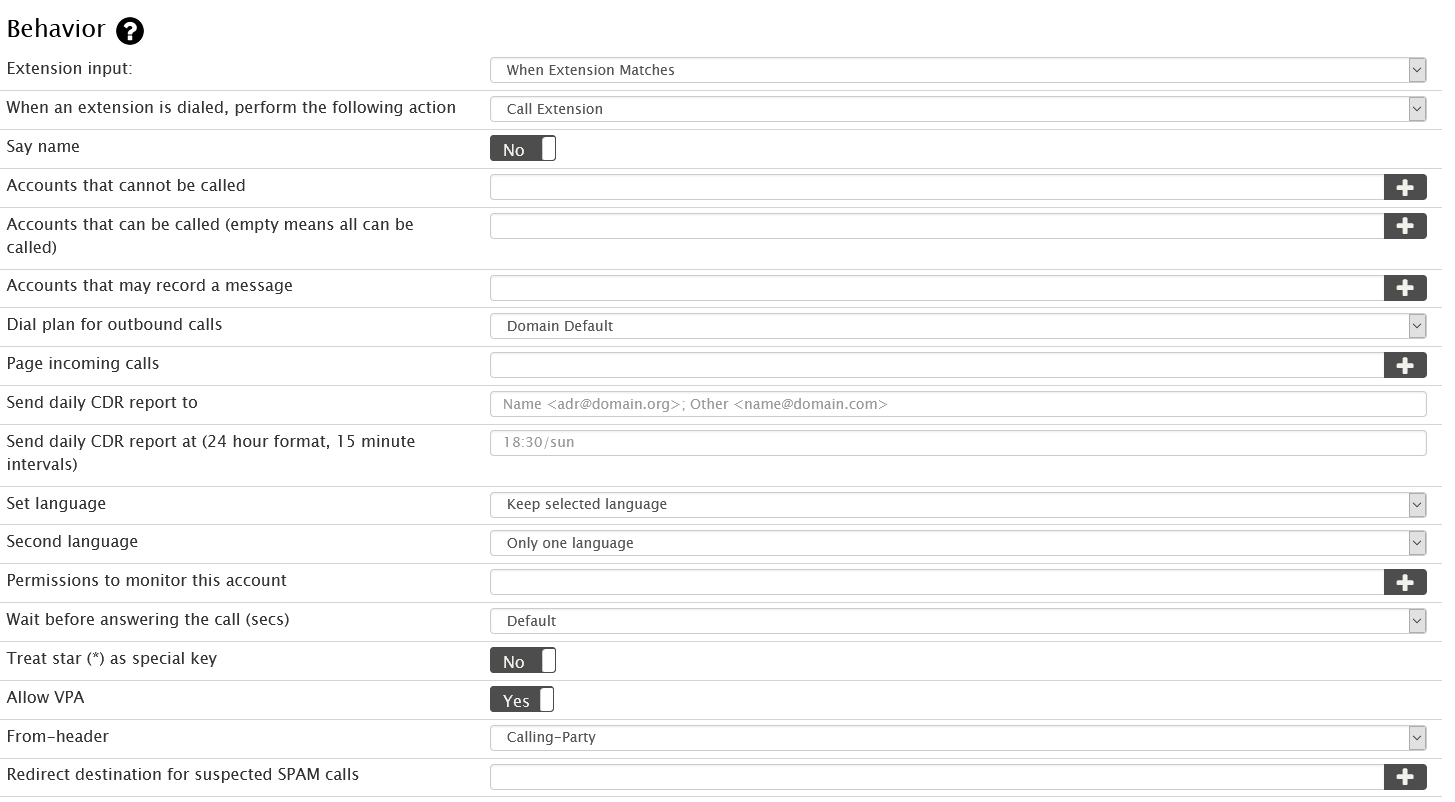
Extension Input: This setting allows you to determine when the auto attendant will begin the search for an extension that matches the user’s input. The available options are detailed below:
- When Extension Matches: The auto attendant will wait until the caller’s digit sequence matches an existing account. Once the auto attendant finds a match, it will call that extension. This mechanism is useful when accounts of varying name length are used; however, it might be annoying to callers who enter a non-existing number since the auto attendant will never begin the search.
- After 1/2/3/4/5 Digit Input: The auto attendant will wait until the correct number of digits has been entered before it will begin looking for an account that matches. If the account does not exist, the system will play an announcement indicating that the extension does not exist.
- User Must Hit Pound: The auto attendant will wait until the user hits the # sign before searching for an extension. This mode is useful in variable-length scenarios
When an extension is dialed, perform the following action: Instead of just calling an extension (which is the default) you can also perform other actions:
- Hot Desking: The PBX will hot desk on the dialed extension. This will require entering the PIN for the extension.
- Start Call Review: The PBX will start the call review for the dialed agent group.
- Goto Mailbox: Instead of calling the extension, the PBX will go straight into the users mailbox.
Say Name: When this setting is enabled, the system announces the name that was recorded for the account being called. If the user did not record a name, the system will play back the extension number.
Accounts that cannot be called: Here you can specifiy extensions that cannot be called directly from the Auto Attendant
Accounts that can be called (empty means all can be called): Here you can se the accounts that can be called. if left empty then all accounts not in the “Account that cannot be called” will be reachable.
Accounts that may record a message: Enter the extensions that are allowed to record auto attendant messages.
Send daily CDR report to: The call data record (CDR) lists all calls that come into the auto attendant. The report is sent nightly at midnight to the email address listed in this field. Only one email address is allowed in this field.
Set Language: The auto attendant supports multiple-language environments. You may explicitly specify the language that should be used as the primary language. This setting may differ from the default language in the domain.
Second Language: If you are operating the system in a dual-language environment (for example, Germany and France), you may want to offer callers a second language. To set this up, use direct destinations, as shown in Figure 9-4. The destination that you send the caller to should have the announced language. If you do not enter a destination, the system will switch the language but continue waiting for input. When a hash sign is placed after a direct destination, the system will wait a few seconds to prevent a conflict with extensions beginning with the same number (in this case, a “1,” as shown in the example below).
Permissions to monitor this account: This setting defines which extensions may monitor the status of this account, for example with a BLF button. By default, all extensions are allowed to see the status of an account. The setting is a list of extensions and wildcard patterns, separated by space characters. If the list element contains a “np” (no pickup) flag after a colon separator, then the monitoring will show only if the account is idle or busy. An example of a setting would be “41 42 5* 61:np 70*:np”. The “np” flag was introduced in version 61.
Wait before answering the call: This setting determines the number of seconds that will lapse between the time the system picks up the call and the time the welcome message begins playing. Use this setting if the initial part of the greeting is cut off.
Treat star (*) as special key: This setting allows you to deactivate the functionality of the star key so that it will behave similarly to keys 0 through 9 when the auto attendant is playing a message.
Timeout Handling

The timeout functionality allows you to provide callers with a way to exit the auto attendant when calling from phones with no dual-tone multi-frequency (DTMF) signalling (i.e., Touch-Tone). Without DTMF signalling, callers are not able to press the auto attendant options and would otherwise be stuck. The timeout functionality lets you specify how long the auto attendant should wait before it redirects the call or hangs up.
Redirect Number: This setting allows to you to tell the auto attendant where to direct a call when a caller does not enter the required information within the set timeout period. Enter an extension number into this field.
Timeout(s): The auto attendant will redirect a caller to the redirect number after a specified number of seconds.
Hangup Timeout: The auto attendant will terminate a call after a specified number of seconds if the user does not enter anything. This feature call help clear a call when the PSTN gateway is not able to detect that the caller has already hung up.
Number of times to repeat the welcome message: This setting determines the number of times the welcome message is played.
Night Service
![]()
Night service is used to redirect calls to other extensions or phone numbers during certain times of the day/night or other events that are outside normal business hours. Before night service can be used, a Service Flag account must be created for each night service number.
Service Flag Account: Once you have created the service flag account(s), enter the number of the account(s) as shown below.
Night Service Number: Once a service flag is in place, the auto attendant can redirect calls directly to the indicated night service number(s). Internal extensions or external number phone numbers may be used in this field.

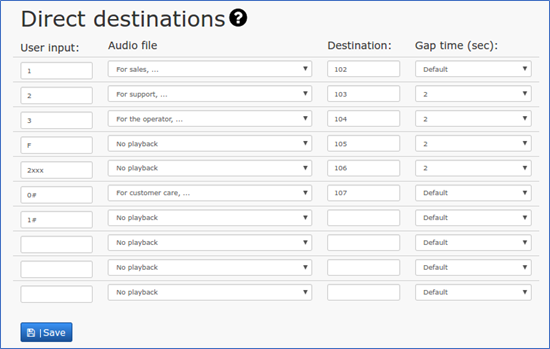
Direct Destinations
The Direct Destinations feature is somewhat like a built-in version of the IVR system. To direct inbound calls to specified extensions, you can use the pre-configured destination fields and link them to pre-recorded announcements and user input options. Using the sample shown below, the auto attendant’s welcome message will be as follows: “For Sales, press 1. For Support, press 2. For Operator, press 3.
Yuo may also record a personal welcome/greeting that will override the default messages for a more persoonalised greeting. This is explained further into the guide.
When configuring straightforward, uncomplicated auto attendants, direct destinations are a great solution. However, when configuring auto attendants that require advanced IVR development and functionality, the IVR node is recommended.
Once the direct destination links have been established, the system will call the destination number whenever a caller enters the number that is associated with it. In the sample shown above, when the caller presses 1, the call will be connected to extension 102.
By placing a Pound/Hash sign after the direct destination (e.g., “1#”), the system will wait 2 seconds before dialing the direct destination. This is useful if you have extension numbers in the 100 range (101, 102, etc.). The 2-second delay ensures that the caller’s complete input (e.g., 101) will be processed rather than just the first digit.
Input number: This number can be one or multiple digits; however, the system dials direct destinations immediately after a user has provided keypad input, so overlapping between a direct destination and an extension number can be a problem. For example, extensions starting with “1” would conflict with a direct destination of “1” because the system would be unable to dial the extension number. The best way to avoid this situation is to choose extension numbers that do not overlap with either direct destinations or mailbox and outbound call prefixes. The extension range 4xx through 7xx meets these criteria. Wild cards can also be used in this field.
If circumstances render it difficult to change the extension assignments (e.g., business cards with extension numbers already in circulation), a timeout mechanism can be used. By placing a pound/hash sign after the direct destination (e.g., “1#”), the system will wait for 2 seconds before dialing the destination.
Destination: This number can be either an internal number (e.g., an extension or conference room) or an external number. When more than ten direct dial options are needed, auto attendants can be nested within one another.
Gap time: This setting determines the number of seconds that will lapse between the different audio options: e.g., “For sales, press 1” (3 seconds), “For accounting, press 2” (3 seconds), etc.
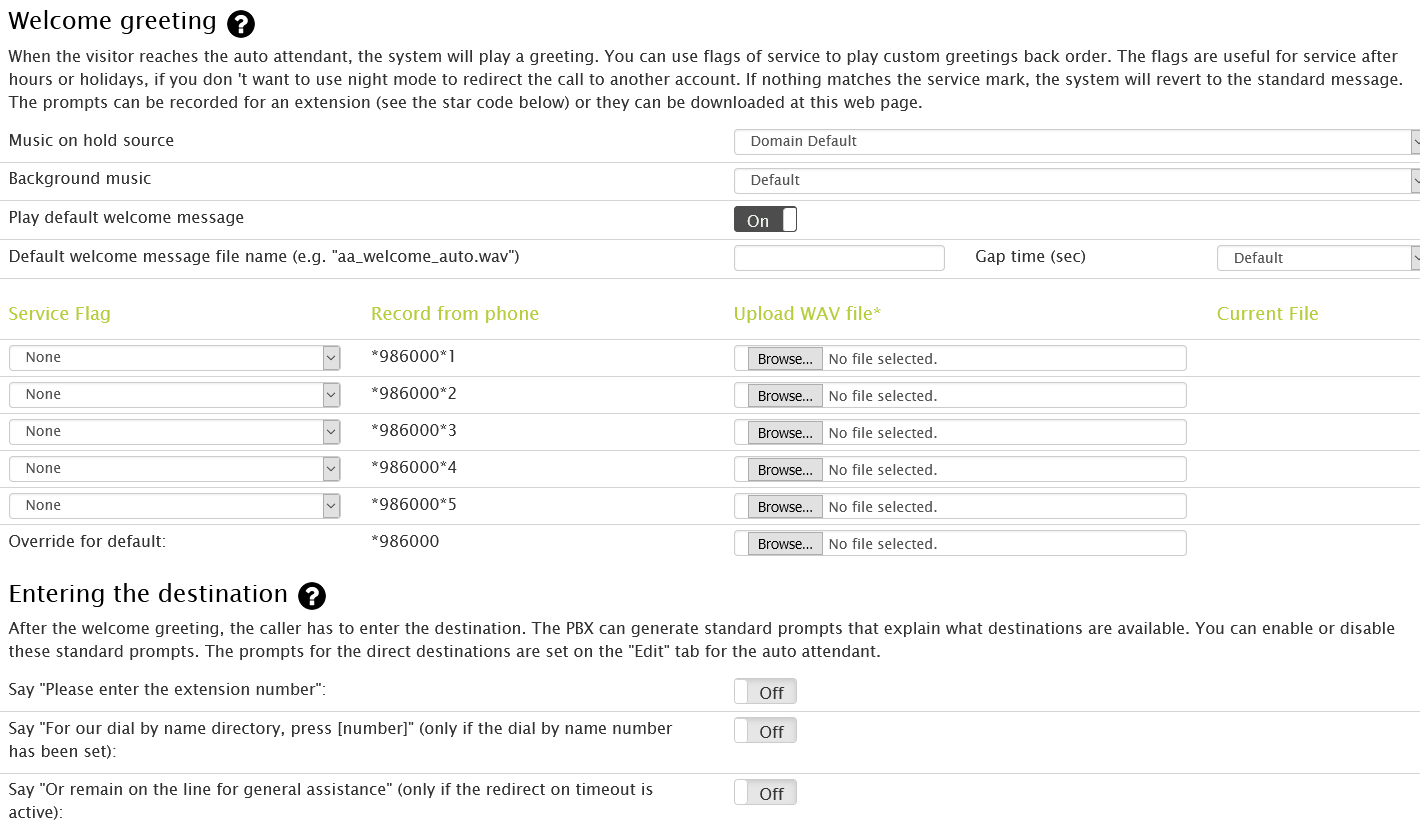
Using Personal Message
Many business’s would prefer to have a custom, more personalised greeting on their Auto Attendants.
To do this follow the below steps;
From an extension registered to the PBX and listed as allowed to record a message dial *98 folowd by the accoutn number of the Auto Attendant. in our example the Auto Attendant is account 6000 so we would dial *986000 and connect the call.
You will be played back instructions to record your message after the tone and press # to finish the recording.
Once this is recorded it will appear in the overide for default IVR shown in the below example.
You must ensure the “Play default welcome message” is set to on and all other options are set to off for the Auto Attendant to use this recording.
Conference Rooms
A conference room or conference server is normally an expensive add-on with traditional phone systems. With the PBX telephone system, you can have your own conference rooms within your own system. Several types of conferencing can be used on the system. The conference account has a wide range of features.
Scheduled conferences: Allows users to plan in advance for the conference.
Ad hoc conferences: Allows users to pull together a conference at a moment’s notice.
Creating a Conference Room
Navigate to the conference rooms tab within the side bar of your Elite Voice portal.
Click Add button within the Conference Room page
In the Account Name field, enter an extension number and/or alias, i.e., a DID number. When entering an alias in addition to an extension number, use the following syntax: 667 01624666666.
Press Create.
The conference room(s) will be created which you can see in the “conference rooms list” or in “all accounts list”, where you can enter each conference room just by clicking it, in order to modify it if you want, as explained below.
Configuring your Conference Room
Once you’ve created a conference room account, use the following information to configure it.
Go to your selected domain in the PBX web interface.
Go to Conference Rooms.
Click on any conference room from the list that you want to change.
Here you can configure the settings. You can also go back to the list of Conference Rooms, if you want, by clicking on the List tab above.
Explanation and use of some of the settings
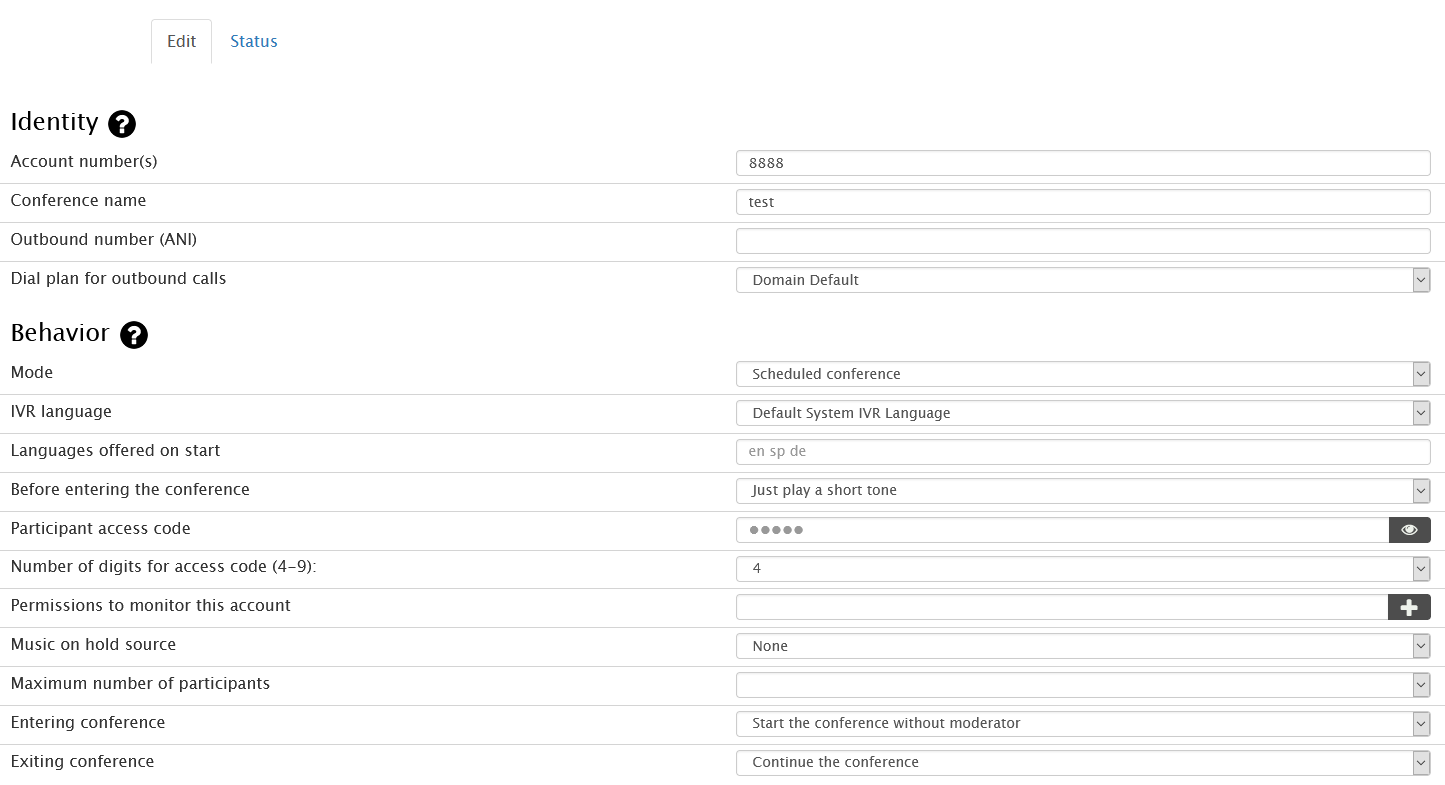
Identity
Account Number: You can change the name of your conference or the extension number of your account at any time.
ANI: The conference account uses an ANI (automatic number identification) when sending calls to an external number.
Conference Name: It is recommended that you choose an understandable name for the conference, e.g., Company A conference mixer (2106171234 Ext 654), as this text will be used in conference invitation emails.
Authentication
Mode: Select Ad-hoc conference.
IVR Language: From the dropdown list, choose the language that will be used for the voice responses.
Moderator Access Code: This field can be left empty; however, the conference cannot be moderated without an access code.
Participant Access Code: When no moderator access code has been set, this field can be left empty; otherwise, a code is required (users will be unable to access the conference without a code if the moderator has one).
Calling into an Ad Hoc Conference
To hold an ad hoc conference, users need to know the extension number or DDI that has been reserved for ad hoc conferencing. If the designated extension is 665, then all parties who enter 665 from their extension phones will be joined to the same call. Participants will be required to enter an access code if one has been set; otherwise, they will be joined directly into the conference room. Any number of participants can join the call. (Participants can also be blind transferred into the conference.)
Hunt Groups
A hunt group is a set of extension numbers that are embedded inside a single virtual extension. Incoming calls are rotated through the pool of extensions until someone answers and the caller is connected. (Cell phones can also be configured to be included in calls made to a hunt group.)
Creating a Hunt Group
Go to your Elite Voice Portal.
Go to hunt groups by clicking on Hunt Groups under Accounts Tab.
On top, click the tab Create to create a new hunt group.
In the Account Name field, enter an extension number and/or alias, i.e., a DID number. When entering an alias in addition to an extension number, use the following syntax: 667 01624666666.
Press Create.
Configuring a Hunt Group
Once you’ve created a hunt group account, use the following information to configure it.
Go to Hunt Groups.
Click on any hunt group from the list that you want to change, here you can configure the settings.
Explanation and Use of Some of the Settings
Identity

Account Number(s): This field takes extension number(s) and/or DID number(s). The number of DIDs that can be input into this field is unlimited.
Name: This field allows you to create an alias so that you can quickly identify the Account among other Accounts.
Outbound number (ANI): The hunt group uses an ANI (automatic number identification) when sending a caller to an external number.
Stages

The extension numbers that are part of a hunt group can be arranged into groups known as stages. Each stage is configured to ring for a specified period before the system begins ringing the next stage. To continue ringing the same extension throughout all stages, include that extension in each ring stage. A last-resort or final stage number (often an auto attendant or a cell phone) can also be used when none of the extensions pick up the call. A common use for the hunt group is to use the hunt group as the main number for incoming calls, then put the receptionist, secretaries, and assistants on the different stages.
You can also include regular numbers in the hunt groups, not only extensions. That makes it possible to call devices that cannot register as SIP endpoints. If you want to include cell phones in hunt groups, you better use the extensions number and enable the cell phone forking in the extension setting.
The hunt group supports three stages and a final stage. Each stage can be configured to ring for a different number of seconds, and the final stage can be either an internal or external phone number.
For each stage:
- List the extensions or numbers that should be part of that stage. When entering multiple extensions, use a space as a separator (only one number is permitted for the final stage).
- For duration, specify the length of time that the system should ring each stage before ringing the next. The duration of the stages must be specified in seconds.
- For unwanted stages, leave the fields empty.
If all extensions of a stage are unavailable, the system will immediately move to the next stage.
If you check the missed flag for the stage, the PBX will send a missed call indication to the phone when it moves to the next stage if the phone is not part of the next stage.
Hunt Group Features
Custom ringing Each hunt group can be configured with different ring tones. Employees can determine which hunt group is calling.
BLF indicator The system can be configured so that the busy lamp field indicator lights up when the hunt group is in use. Hunt group activity is visible through the BLF indicator.
Group name caller-ID Hunt groups can have a unique name and can be configured to display the name of the group, the caller’s caller-ID, or both when a caller enters a hunt group. Helps management decide who belongs in each named group. Employees know the nature of the call before answering it.
Three-stage extension ringing – Hunt groups can be configured to ring 1–3 different groups of extensions. The system will ring each group in succession until the call is answered. Managers can direct calls to selected groups of extensions in a specified order.
Final stage to cell phone – After calling the extensions listed in stages 1 through 3, the system calls the “final stage” number, which can be an auto attendant, an extension, or an external number. Callers are sent to a manager as a final means of assistance. This feature can also be used to gauge whether the group of extensions is too small or whether the employees are working properly.
Ring stage duration – Hunt group stages can be configured to ring for different durations before the system rings the next group of extensions. Call flow control can be established. Intervals that keep customers waiting a minimum amount of time can be used.
Recordable calls – Calls made to hunt groups can be recorded and saved on the system. Recorded calls can be reviewed by management to fine-tune employee performance. Disputes can be easily resolved by emailing the recorded conversation.
Behaviour
Behaviour settings allow you to control numerous account behaviours. You can choose a ring melody, a display header, and music on hold source. You can also enter a safety net phone number that will be used if no one picks up a call. Other settings are here as well.
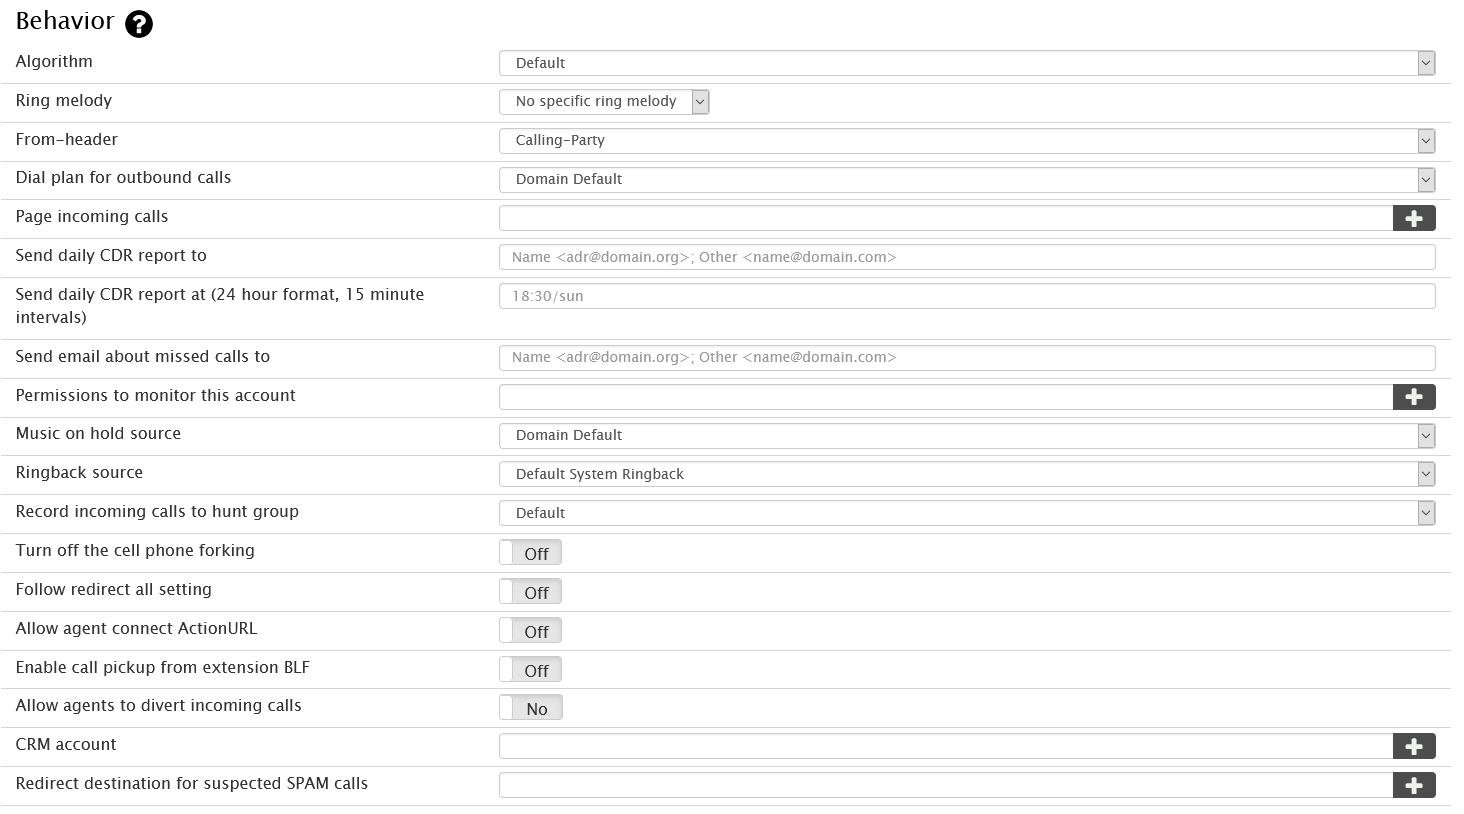
Algorithm: By default, the hunt group calls all agents, IVR nodes and numbers in each stage up and connects the call to the first that accepts the call. In the case of IVR nodes this is the first that is idle. If the algorithm “Select most idle agent per stage” the system will call only one agent per stage. This makes it possible to automatically balance the call load on several extensions in a fair way.
Ring Melody: This setting allows you to set the ring melody so that hunt group members will be able to distinguish regular calls from hunt group calls.
Custom 1 through 4: Custom ringtones allow users in a hunt group to distinguish hunt group calls from other calls. Before customized ringtones can be used, you will need to upload your ringtones in the correct format (WAV, 16Bit, 8000hz, Mono) to the audio uploads section of the Elite Voice Portal.
External Call: The ring tone will be long.
Internal Call: This ring tone will be short.
From Header: This setting allows you to set the display name that hunt group members will see when someone is calling. More information on this subject is available on a separate page From Header in Groups.
Dial plan for outbound calls: This setting allows you to configure dial plan behavior that is different from what has been set on the extension. For example, if the dial plan on the extension does not allow for outbound calling, but you want to allow the extension to receive hunt group calls on their cell phones, you can select a dial plan here that would allow for that. There are many other uses for this setting as well.
Send daily CDR report to: The call data record (CDR) lists all calls that come into the hunt group. The report is sent at midnight each night to the email address listed in this field. Only one email address is allowed in this field.
Permissions to monitor this account: This setting defines which extensions may monitor the status of this account, for example with a BLF button. By default, all extensions are able to see the status of an account. The setting is a list of extensions and wildcard patterns, separated by space characters. If the list element contains a “np” (no pickup) flag after a colon separator, then the monitoring will show only if the account is idle or busy. An example for this settings would be “41 42 5* 61:np 70*:np”. The “np” flag was introduced in version 61.
Music on hold source: From the dropdown list, choose the music that callers will hear while waiting.
Record incoming calls to hunt groups: When this setting is enabled, the system will record all calls that come into the hunt group. The recordings can later be retrieved and reviewed.
Turn off the cell phone forking: The cell phone inclusion of the agents cell phones can be turned off specifically for this hunt group.
Allow agent connect ActionURL: When this flag is set the PBX will trigger the ActionURL for connecting an agent.
Enable call pickup from extension BLF: By default, the PBX will show that an extension is busy when a call rings the agents phones. If this flag is turned it, the PBX will make it possible to pick the hunt group up from the extension BLF.
CRM account: When using CRM integration, the system needs to associate a call to the hunt group with an account that exists on the CRM system if there was no agent that picked up the call (e.g. in the case of a missed call).
Redirect destination for suspected SPAM calls: If there is a suspected SPAM call, this field tells the system where to redirect the call. If the field is empty the system will accept the call.
Night Service
Night service allows you to redirect calls to other extensions during off-hours, meetings, etc. Before you can use night service, you need to create a service flag account.
Service Flag Account: Once you have created the account, enter the number of the account.
Always: This rule will always redirect calls. This can make sense if this is the last rule in a list of other rules.
No agent has phone registered: This rule is useful when an office has lost internet connectivity and all agents went offline and the agents are not using any cell phone inclusion. A redirection target can be for example another hunt group, a mailbox or another hunt group that has the cell phone inclusion turned on.
Night Service Number: With a service flag in place, the hunt group can redirect the calls directly to the night service number(s) shown in this field. Internal extensions and external numbers are acceptable.
Note: You may specify more than one night service flag. Once one has been entered an additonal line will be made available. This is useful if you use an automatic Service flag for your operational hours but also want to have manual flags in place that can be switched on and off from a handset during the operational hours E.g., When the office is holding a meeting or training.
Agent Groups
An agent group, also known as automatic call distribution (ACD), is a system that routes incoming calls to a specific group of agents. Before connecting to an agent, callers are placed inside a queue, allowing agents to deal with incoming calls without losing other callers to busy signals or unanswered phones. While waiting, callers hear music and pre-recorded announcements. Agent groups can be monitored using a number of monitoring methods.
A caller reaches an agent group in one of two ways: either by calling the agent group directly or by calling a company’s auto attendant. When agent groups branch off the auto attendant, callers must press the number that corresponds with their choice. The caller has reached an auto attendant offering three different choices: Sales, Accounting, and Support. The caller hears these options in the form of a pre-recorded messages. Each option will connect the caller to an agent group, and the caller will be placed inside a queue until an agent becomes available.
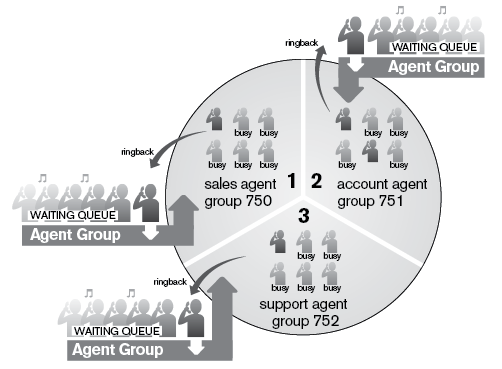
Agent groups are often found in offices that handle high-volume customer calls from callers who do not need to speak with a specific person but who require assistance from any of multiple persons, like sales representatives and airline reservations attendants. Agent groups have a wide range of features.
Creating an Agent Group
Go to your Elite Voice Portal.
Go to agent groups by clicking on Agent Groups under Accounts.
On top, click the tab Create to create a new agent group.
In the Account Name field, enter an extension number and/or alias, i.e., a DID number. When entering an alias in addition to an extension number, use the following syntax: 667 901624666666.
Press Create.
The agent group(s) will be created which you can see in the “agent group list” or in “all accounts list”, where you can enter each agent group just by clicking it, in order to modify it if you want, as explained below.
Configuring an Agent Group
Once you’ve created an agent group account, use the following information to configure it.
Go to Agent Groups.
Click on any agent group from the list that you want to change.
Here you can configure the settings.
Explanation and Use of some of the settings
Identity
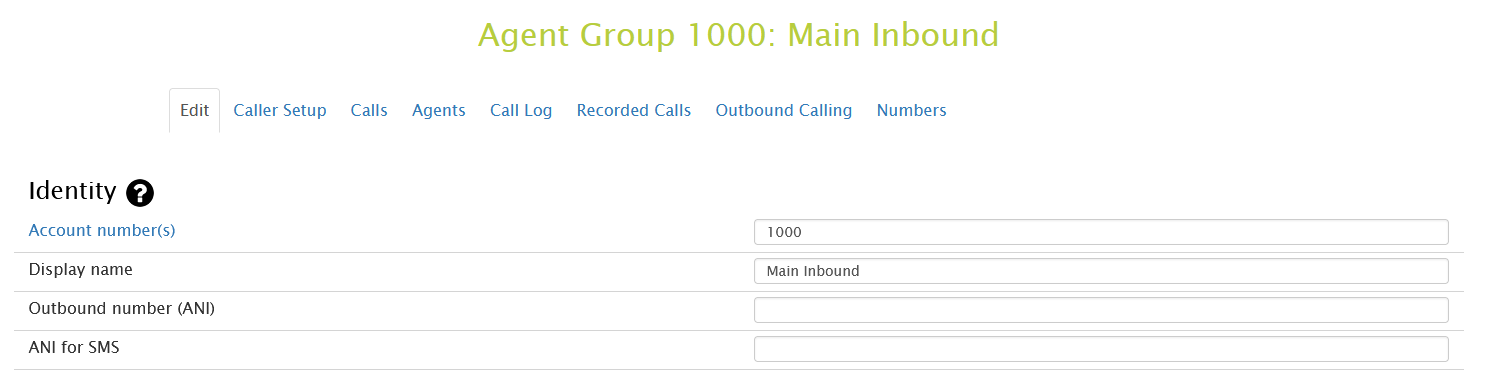
Account Number(s): This field takes extension number(s) and/or DID number(s). The number of DIDs that can be entered into this field is unlimited.
Display Name: This field allows you to create an alias so that you can quickly identify the Account among other Accounts.
Agent Set Up
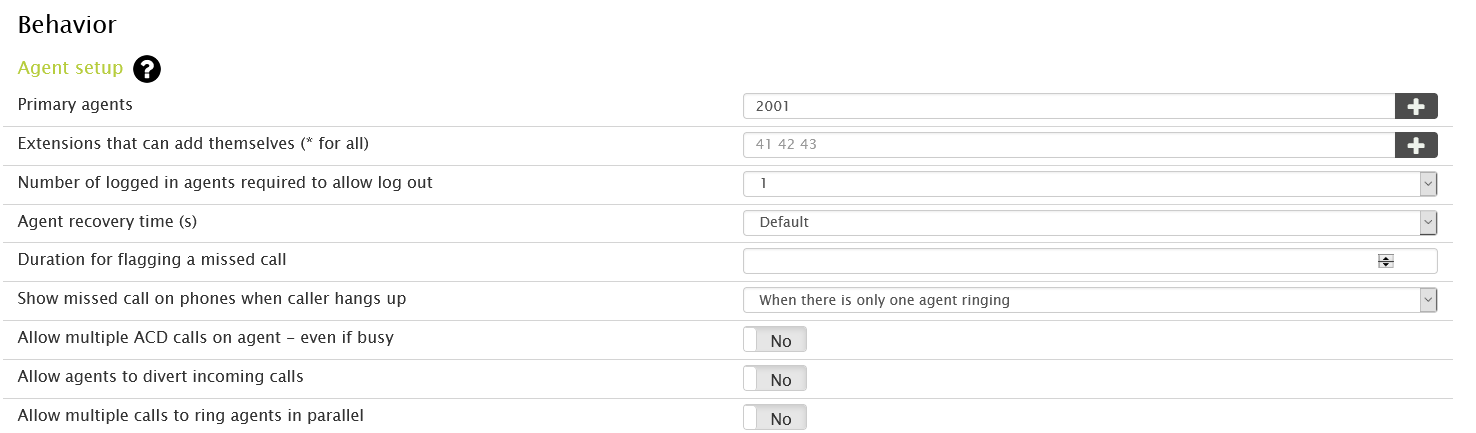
Primary Agents: This setting controls who is logged in the ACD as agent. The setting can be changed through the web interface, but it can also be changed with star codes, e.g. when the agent logs in from the IP phone. In the case of escalation the list of the additional agents will be added to the list, so that those agents don’t have to log in.
Extensions that can add themselves ( for all):* This setting controls which agents can dynamically join or leave the agent group. It can also be used to add non-agents to the agent group, which can be useful during especially busy periods when additional people are needed for the queue. If a star is used in this field, extensions that use *64will automatically be listed in this field, i.e., the list will grow and decrease as people log in and out. It is recommended that actual extensions be entered into this field.
Number of logged in agents required to allow log out: This setting specifies the number of agents that must remain in the agent group before agents are permitted to jump out. If this setting is too high, agents will be unable to log out of the agent group. For small agent groups, a value of 1 is recommended.
Agent recovery time(s): Use this setting to ensure that an agent has adequate time to recover from the previous call before taking another call. In busy call centers, 2 seconds might be an appropriate setting. However, agents who are required to record notes about the call will need a longer value. In these cases, 60 seconds might be more appropriate. The recovery time also allows an agent to log out of the agent group.
Duration for flagging a missed call: This setting determines how long a call must have been ringing before it is considered a missed call for an agent. If the agents picks up the call after this timeout this call is not considered a missed call.
Allow multiple ACD calls on agent – even if busy: This setting allows a caller to be sent directly to an agent, even if all agents are busy. It prevents the caller from sitting there listening to music and gives the agent the opportunity to put their current call on hold and take the new call. This setting should generally not be used.
Allow multiple calls to ring agents in parallel: When this flag is set, the ACD will proceed ringing more agents even if there are more calls ringing up agents. This generally makes sense when there are only one or only few agents added in each stage or there are a lot of agents available for accepting calls.
Agent Selection
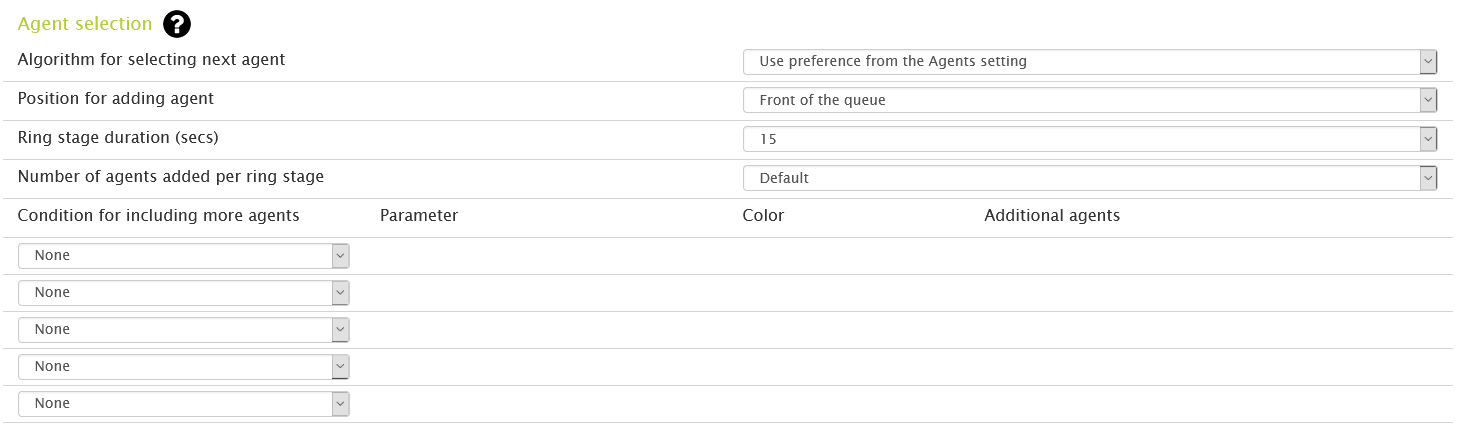
Algorithm for Selecting next agent: The agent selection algorithm allows you to establish the method that will be used by the system when connecting a caller to an agent. Choose from the following options:
- Random: This algorithm randomly selects the next agent. This is a reasonable algorithm in environments where it is not important as to which agent processes the call.
- Ring longest idle first: This algorithm is designed to balance active call time amongst all the agents. The queue keeps a list of the agents and moves an agent to the end of the list when an agent connects a call. This ensures that the agent with the longest idle is at the front of the list.
- Use preference from the Agent’s setting: This algorithm uses the extensions listed in the Agent setting. The agent listed first will be tried first. If that agent is busy, then the system will jump to the second one and so on.
Position for adding agent: Depending on your setting, newly logged in agents will be positioned at the front of the queue or the back.
Ring stage duration (secs): At regular intervals, the system checks agent availability and determines whether the next caller should be pulled out of the waiting state. The ring stage duration setting establishes this interval. For larger queues, shorter intervals are recommended, as it is quicker to get callers out of the queue and into a ringback state. The default value for this setting is 5 seconds.
Number of agents added per stage: In every scheduling interval, the system adds only a limited number of agents from its pool of available agents to its list of ringing agents. For large agent groups, a typical value would be one or two, as this will ensure that not all agents receive calls at the same time and so that the system CPU is not overtaxed with simultaneous calls.
Caller In Queue
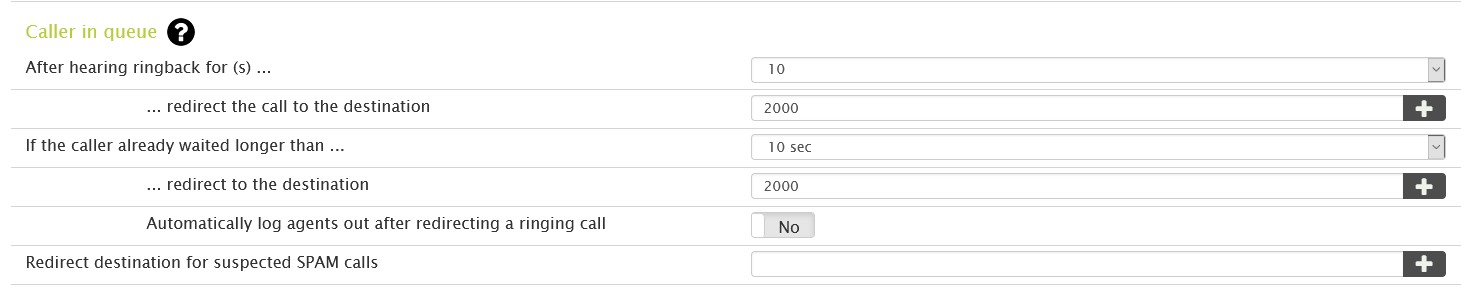
Redirecting Calls From Queue
This section allows you to establish timeout settings that will determine the length of time a call is kept in queue or ringback state in a given situation. In this section, you can instruct the system to redirect a call after the call has been in ringback for a given length of time. You can also instruct the system to redirect a call once a caller’s wait time has passed a certain threshold.
After hearing ringback for … seconds, the system will redirect the call to the destination. The destination can be either an internal number (e.g., a hunt group) or an external number (e.g., a cell phone or home number). If you redirect the call to the same ACD, the call will be put back at the front of the queue and be scheduled as the next call to ring agents.
If the caller has already waited longer than (X) seconds,the system will redirect the call to the destination. If a caller has waited a while in the queue, this will immediately redirect the call to another destination. Note: The caller is classified as “waiting” when all agents are busy with other customers and the new caller is waiting for a free agent.
Automatically log agents out after redirecting a ringing call: This setting will log agents if the call in the ACD was redirected while agents were ringing. Agents need only log back in to return to the agent group. This setting is directly linked to the After hearing ringback settings. The caller is redirected to the extension or agent (whichever is chosen) that has been specified in that setting after the timeout in that setting has been reached.
Redirect destination for suspected SPAM calls – If the ACD inbound call has been suspected as a SPAM call by the PBX (from the domain / admin level SPAM detection settings) then number entered here will be where these calls will be redirected.
Miscellaneous
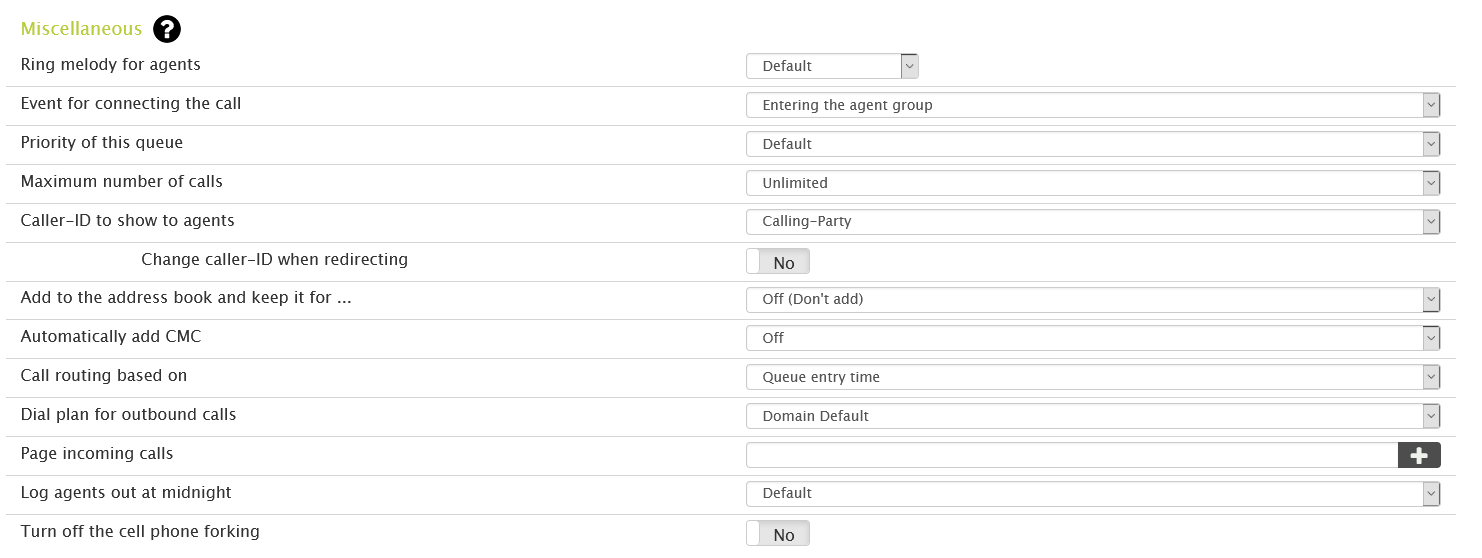
Ring Melody for agents: It is important to set the ring melody so that the phone knows which one to play and so that agents will be able to distinguish regular calls from agent group calls.
- Custom 1 through 4: Custom ringtones allow users in an agent group to distinguish agent group calls from other calls. Before customized ringtones can be used, you will need to provide your own ringtones, modify the ringtones.xml file, then place it into the html directory. When the phone receives the alert-info header from the system, it will respond with a different ring tone based on the ringtone that was selected from the web interface.
- External Call: The ring tone will be long.
- Internal Call: This ring tone will be short.
Event for connecting the call: This setting allows you to tell the system when to pick up the line if the line has not been picked up already (for example, by an auto attendant).
- Entering the agent group: The call is picked up when it enters the agent group. In most cases, this is suitable behavior.
- Music playback: If the caller has to wait for an available agent, the caller is put on hold and hears music while waiting. If the call goes directly to an agent, the queue waits until the agent picks up the call before connecting it.
- Agent picks up call: The call is not connected until the agent picks up the call, even if music on hold and/or announcements have been set. This option is useful if the waiting time in the queue is typically very short and there’s no risk of the carrier disconnecting the call due to no answer.
- Never connect: The call is never connected. This is useful if you want to provide free services to callers. This setting prevents the carrier from seeing the call. As with the other options, there is a risk that the carrier will not tolerate this behavior and will hang up the call after a certain timeout.
Priority: This setting determines which agent group will be the priority when an agent is part of multiple agent groups. For example, if two calls are on two agent groups and the PBX has to choose this agent, it uses this setting to determine which agent group call has the higher priority.
Maximum number of calls: If you want to limit the number of active calls on the agent group, you can use this setting.
After the maximum calls is reached: This setting determines what the system should do when the maximum calls have been reached. The system can either reject the call or instead connect the call and play a message.
From – Header: This setting allows agents to see who the call is coming from. By default, the name of the calling party is displayed, but the system can be configured to display the name of the queue, either by itself or with the calling party. When both are shown, the system puts the caller-ID in brackets after the display name. This mode requires that the phone have enough space to display a long number. When using this mode, choose a short group name so that it requires less space.
Automatically add CMC: When this feature is turned on, the caller’s CMC will appear in every CDR that is written on the disk. The CMC is used for automatic billing.
Call routing based on: This feature allows callers to be connected to agents who have handled their calls in the past.
- Queue entry time: All callers will be placed in queue and will remain there until an agent becomes available.
- Try to pull out callers when their last agent becomes available: Callers will be pulled from the queue if their last agent becomes available.
Dial plan for outbound calls: Select the dial plan that will be used for this account.
Turn off the cell phone forking: By default the ACD will try to include the agent cell phone when trying to connect a call. This behavior can be turned on on the users profile, but it can be disabled per ACD as well.
Monitoring
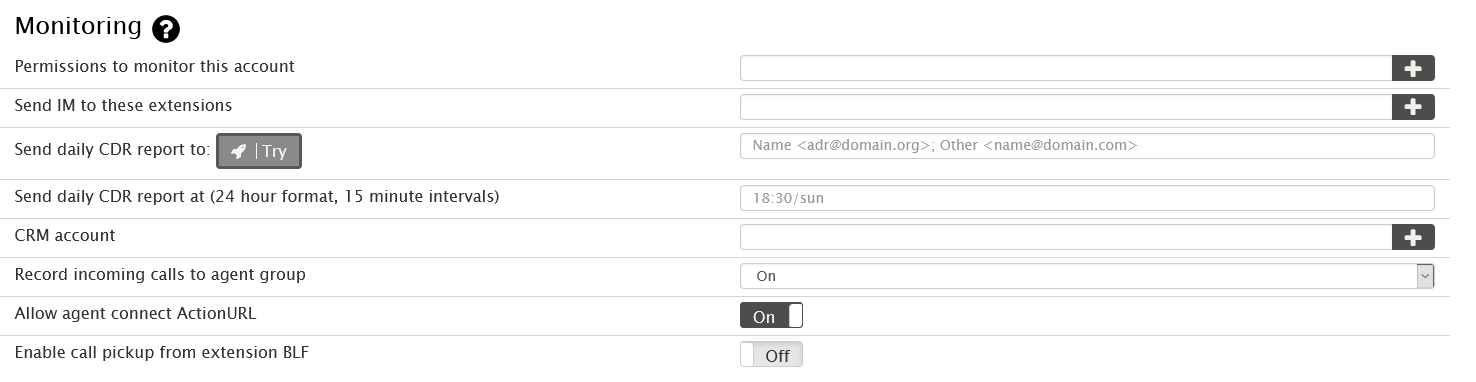
Permissions to monitor this account: Within here you can assign user extensions permissions to monitor the Agent Group. This will provide this user with access to live call logs along with statistics of the calls throughout the day via their login to the web portal.
Send daily CDR report to: The system can be configured to send a daily CDR (every night at midnight) to multiple email address’s this report will detail all the calls into the agent group in that day along with stats on the call.
Enable call pickup from extension BLF: This setting will allow the agent group to be set up as a BLF (Busy Lamp Field) on handsets button configuration. this will allow handsets to intercept calls to the group and answer them.
Night Service
Night service is used to redirect calls to other extensions or phone numbers during certain times of the day/night or other events that are outside normal business hours. Before night service can be used, a service flag account must be created for each night service number.
The first three settings in Night Service allow you to make provision for when no agents are available:
- When primary agents are logged out, send calls to: “Primary agents” refers to the agents that are entered into the All agents for this ACD field.
- When all agents are unregistered, send calls to: It is best to enter a number that is not part of the PBX (e.g., an external number) since the extensions may also be unregistered if the registration issue is due to a power outage.
- When all agents are busy
The following two settings are used to configure the service flag(s) to night service numbers:
- Service Flag Account: Once you have created the service flag account(s), enter the number of the account(s) into this field.
- Night Service Number: Once a service flag is in place, calls will be directed to the night service number(s) indicated here. Internal extensions or external number phone numbers are permitted in this field.
Caller Setup
Audio
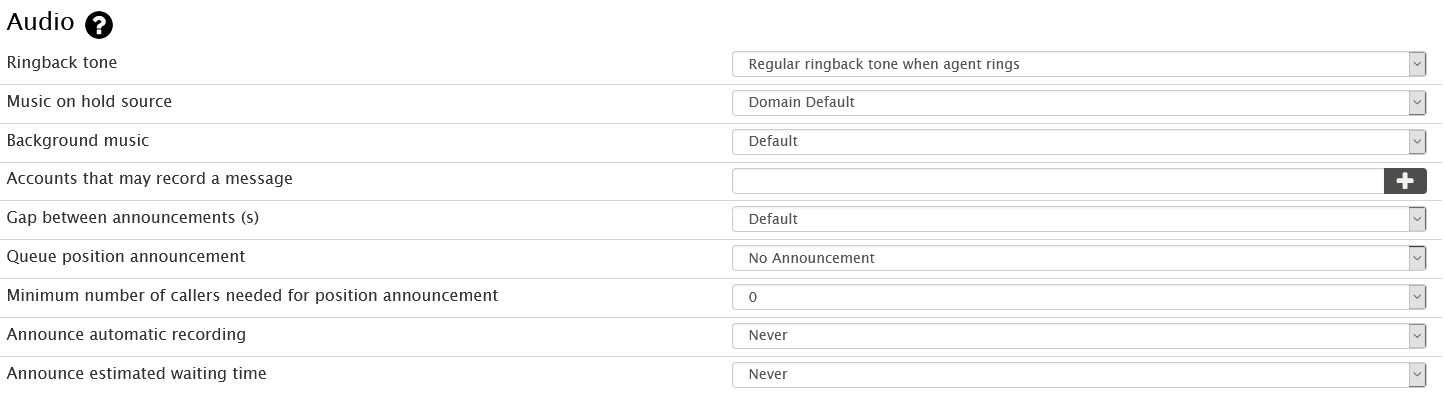
Ringback tone:
-
- Regular ringback tone when agent rings: The caller will hear the agent ringing.
- No ringback tone, continue playing music: Instead of hearing a ringback tone, the caller will hear music. If an agent is no longer at his desk but has not logged out of the agent group, the caller will hear music on hold instead of ringback.
Music on Hold source: From the dropdown list, choose the music that the caller will hear while waiting for an agent.
Background Music: This setting enables you to continue playing the music on hold while playing the messages.
Accounts that may record a message: Specify which accounts may record announcements. When this setting is left empty, all extensions will have permission to record announcements.
Gap between announcement(s): From the dropdown list, select the number of seconds that the system should wait between each announcement.
Queue position announcement: When Announce queue position is selected, an announcement will let callers know their position in queue.
Announce Automatic Recording: It is a legal requirement to tell callers if their call is being recorded. Many companies will have put this in their welcome message on the IVR or Auto Attendant however if these are not used and the Agent group is the direct destination of a DID then call recording must be announced either through the use of this setting or another recording from the company.
Announce Estimated Waiting Time: Here you can set the parameters for announcing waiting time to customers if the wait is longer than to chosen parameter.
Upload Messages
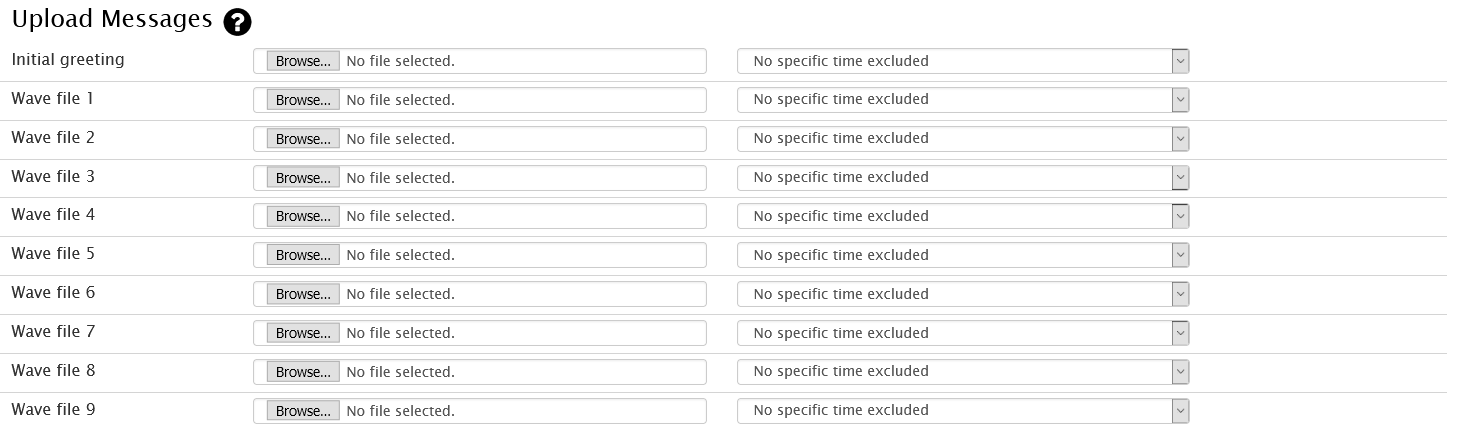
The number of available greetings within any agent group is nine. Record only those greetings that should be used. If no greetings are needed, even an initial greeting, don’t record any. When recording greetings, you need to assign a number to each greeting; for example, *0is the entry greeting, *1is the first greeting, *2is the second greeting, etc. The number is entered as the last number in the string.
CallBack
This feature is for giving the call back option to the user who has a long wait time and is waiting in the queue for the next available representative. So, the call back key is what you set which you want them to press, for them to get a call back.
Example setup for making the ACD call back feature work.
You can setup any of the keys on the dialpad to offer the call back to the listener.
Putting star “*” in allowing callback feature is necessary as the PBX will then announce the call back key number announcement.

Caller Options
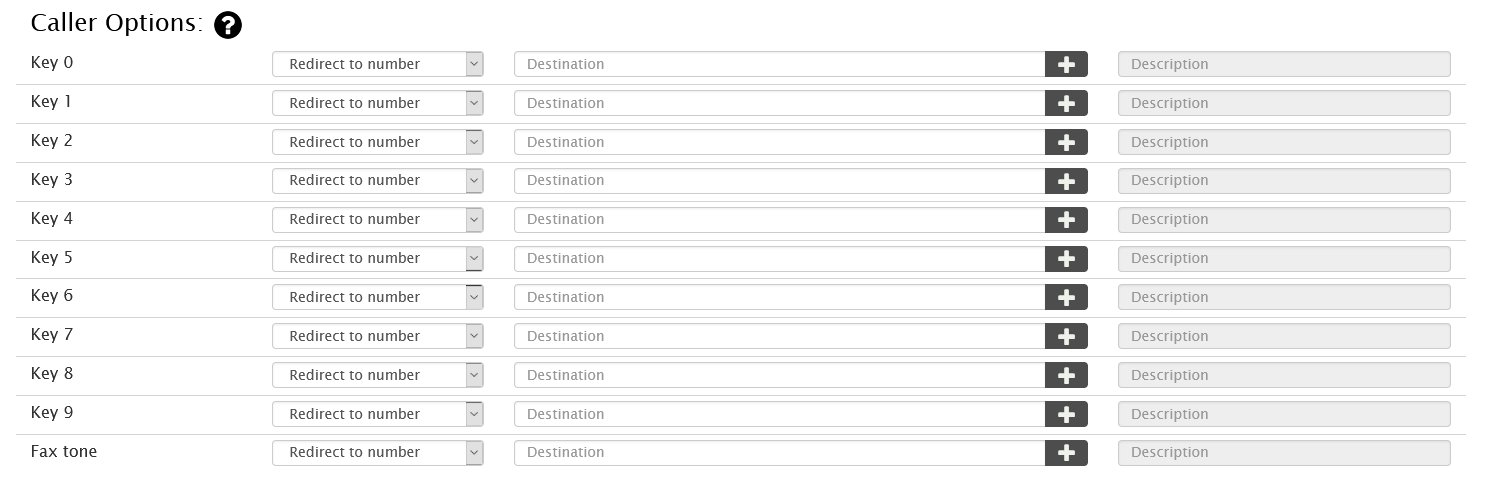
Caller options allow the caller to exit the agent group queue and connect to another destination. To give the caller this option, use the Caller Options fields to map telephone keypad numbers to other extensions or phone numbers.
Once extensions or phone numbers have been entered into the “Key” fields, the caller must be made aware that these options are available. The system will not do this automatically. The place to do this is through the greetings that are delivered by the system (using the *98star code feature). One greeting or several greetings can be used to inform the caller that this additional option is available. In the following table, greeting 2 informs the caller that key 1 can be pressed to leave a message.
Greeting Message Caller Option
0-Welcome to CompanyABC. Your call is important to us. Please hold.
1-Sorry our lines are still busy . . . Have you looked at the support site for answer to your question?
2-Our newest release offers this and that . . . If you want to leave a message, please press 1 now.503
3-Another message . . .
4-Another message . . .
The Message-Music Cycle
While the caller is waiting, the system delivers a combination of pre-recorded messages and music. The messages can be used to provide additional information about your company, or they can be used to provide the caller with additional options and/or a way to exit the queue. Each agent group can be configured to play up to nine recorded messages. Between the messages are “gaps” of music which can be configured to span 5 to 180 seconds. This message-music cycle continues for as long as the caller is in the queue. Message 0 is considered the entry point message (which will never be replayed), and message 1 is the first message. an agent group using six different messages for its message-music cycle. Once message 6 has been played, the system returns to message 1 and repeats the cycle.
This sequencing of messages and music will continue until an agent becomes available. Once an agent is available, the system automatically takes the next call out of the queue, rings the agents, and puts the call into ringback state. Within any one agent group, only one call at a time can be in ringback state, regardless of the number of agents that are available. All other calls remain queued until the ringing call is connected and at least one agent becomes available.
While it might seem logical to conclude that a caller’s time in the queue has ended once the call has been placed in ringback state, this is not always the case. If an agent leaves the desk without logging out of the queue, the ringback state will continue until the system finds another agent to answer the call. To prevent nonstop ringing, you can take two precautions: (1) you can configure the agent group to include additional agents at specified intervals in the ringback cycle and (2) you can configure the agent group to play music during the ringback state. This will prevent the caller from hearing long periods of ringing in the event there are episodes of extended ringback.
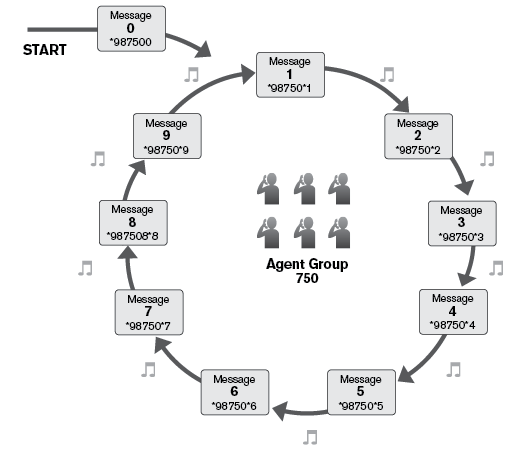
Record Greetings
Dial *98followed by the number of the agent group, then the greeting number (e.g., *1).
Press the confirm button on the telephone keypad.
Listening to Greetings from the Phone
To listen to greetings quickly from the phone, change the gap between announcements to 1 and call the agent group directly from your phone. The recorded messages will be played quickly.
Agent Log in/Log Out
Agents must log into the queue to begin receiving calls. When agents have finished for the day or would like to stop receiving calls from the queue, they must log out of the queue.
Agent group members can use one of two methods (buttons or star codes) when logging in and out of agent groups.
Method 1: Buttons
This method allows users to use a button on their phone to log in and out of agent groups. When configured properly, the button will have a toggle effect. When the button is pressed, users will be logged in to all agent groups, and the associated LED(s) on their phone will light. When the button is pressed again, users will be logged out of all agent groups and the associated LED(s) will no longer be lit. If users need to log out of one agent group before logging into another, multiple Agent login/logout buttons can be configured.
Important: Before you can use this button, the star codes for Agent logged in/Agent logged out must match (e.g., *65/ *65).
Method 2: Star Codes
When using star codes to log in and out of agent groups, users have the flexibility of logging in and out of all agent groups to which they belong. The standard Agent logged in/Agent logged out (*64/*65) star codes (without any argument) will log the agent in to or out of all agent groups:
Service Flags
Service flags give companies flexible methods for handling callers who call after normal business hours. These options include:
Night service, which redirects callers to the extension or phone number of the person covering the business during closed hours
Voicemail, which allows the customer to leave a message and the company to respond as necessary
A recording of important information (e.g., hours of operation, directions, contact information).
Service flags have a wide range of features:
| Feature | Functionality | Benefit |
| Automatic or manual | Service flags can be operated either automatically or manually. When service flags are used manually, users must press a button or dial the service flag account number to activate or deactivate it. | Automatic mode allows businesses with consistent closing hours to have the service flag activate on its own. Manual mode is useful for businesses with irregular closing times and for those who want to control it at a moment’s notice. |
| Hunt group and agent group control | Several hunt groups can be used for different situations (normal operation, extra busy day, shorthanded staff day), and their activation can be controlled with manual service flags. | Quickly shift between plans to reallocate calls, services, and staff. Advanced planning allows you to prepare for the call load. |
| Controlled access to flags | Users can switch the service flag on and off. | Service flag control can be limited to managers at any on-site or remote location. |
| Auto attendant control | Auto attendants are used to answer incoming calls and direct them to other destinations. Service flags let you control the greeting that is used and where the calls are directed. | Use several auto attendants to reduce the risk of losing business. Create one for day, lunch, and night (or prepare one in advance for unexpected closures) and switch as needed. Turn them off/on from a remote location by phone or via the Internet. |
| Simultaneous multi-account activation | The same service flag can be used for multiple accounts (e.g., hunt group, agent group, and auto attendant). All accounts using the flag will switch on or off simultaneously. | Prepare several complete business communication scenarios, and switch to any one of them quickly. |
| Visual indication | When a service flag has been turned on or off, the system sends a message to selected phones. When the service flag has been activated, a designated LED on phones that are configured to receive this indication will light. | Viewing the service flag activity can be limited to managers at any on-site or remote location. |
| Cell phone control | Cell phones can be linked to service flags. If an extension has subscribed to a service flag, then any calls made to that extension will be sent to the user’s cell phone when that service flag is on. | After-hours calls can be sent to a manager’s cell phone automatically. By using multiple after-hours service flags, calls can be sent to the appropriate manager on different days of the week. |
Creating a Service Flag
Log into your Elite Voice Portal
Go to service flags by clicking on Service Flags under Accounts.
Click the tab Create to create a new service flag.
In the Account Name field, enter an extension number and/or alias, i.e., a DID number. When entering an alias in addition to an extension number, use the following syntax: 667/01624666666.
The service flag(s) will be created which you can see in the “service flag list” or in “all accounts list”, where you can enter each service flag just by clicking it, in order to modify it if you want, as explained below.
Configuring a Service Flag
Once you’ve created a service flag, use the following information to configure it.
Go to Service Flags .
Click on any service flag from the list that you want to change.
Here you can configure the settings.
Explanation and use of some of the settings
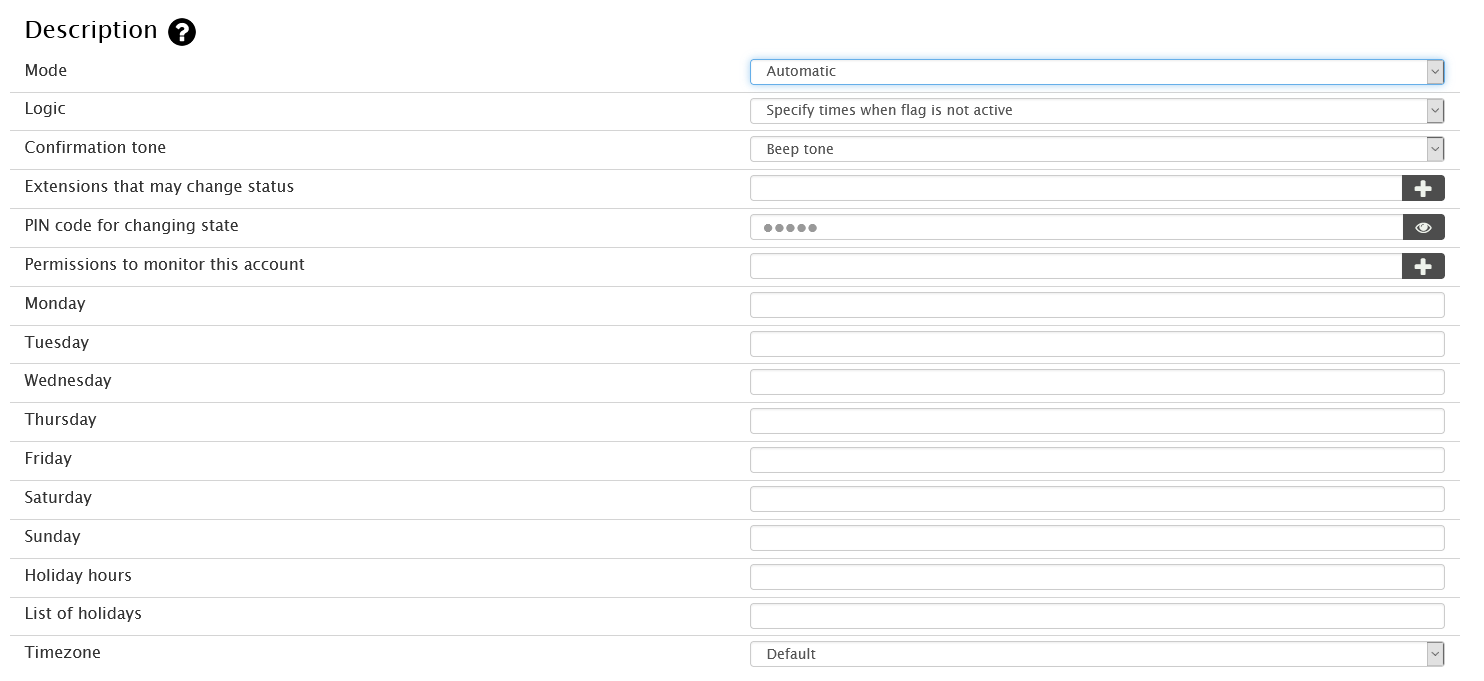
Description
Mode: The service flag can be controlled either manually or automatically.
Manual: Three methods are available for activating/deactivating a manual service flag: Dialing the service flag account number from the phone, configuring a service flag button , and using the Current State setting from the service flag account page.
Automatic: This service flag is controlled automatically according to a set schedule. When creating your schedule, use the following guidelines (a sample schedule is shown below the table):
| Topic | Description |
| Format | You can use either of the following formats; however, both formats require start and end times (e.g., HH:MM-HH:MM):
|
| Multiple time segments | To specify more than one time segment, use a space between the two segments:
|
| Holidays | To specify the days on which you do not want the schedule to be activated, such as a holiday or any other day, use the holiday field. The format for the field depends on the local rules set by the browser. For examle, in the United States, a date is set in the format MM/DD, MM/DD/YY or MM/DD/YYYY; in Germany it is DD.MM, DD.MM.YY or DD.MM.YYYY; in Australia it is DD/MM, DD/MM/YY or DD/MM/YYYY (starting from version 67.1). In the following examples, the MM/DD format is used.
On those days, the system will use the settings of the holiday field instead of the field for the specific day. This makes it possible to define reduced working hours on holidays. |
| Noon time | To specify time during the noon hour (between 12:00 and 1:00 p.m.), you can use 12:00, 12:00P, or 12:00PM. All are treated as day time 12 o’clock. |
| Midnight | To specify midnight, use either 00:00 or 24:00, depending on the start and end times.
|
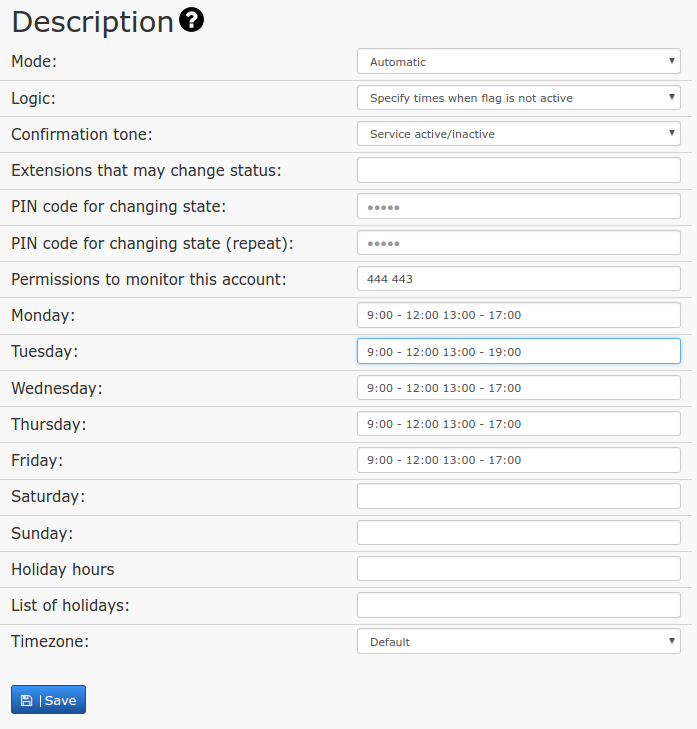
Calling a Service Flag
It is often easier to call the service flag instead of logging into the web interface and changing the flag from there. Both in automatic and manual mode, the state of the service flag can be changed from the phone (since version 5.4.2). Using a PIN code for the service flag makes it easy to control who can change the service flag state, in addition to listing the extensions that are allowed to change the state without PIN code.
In manual mode calling a service flag simply toggles the state. Depending on the state, the PBX plays a different confirmation tone. If a device has subscribed to the service flag state, it will change the LED color.
In automatic mode things are a little bit more complicated. The PBX will offer a menu where the caller can set the beginning of the day, the end of the day and set the hold day as a holiday (or not). Those changes apply only for the current day; the next day the service flag will continue using the automatic settings from the web interface. When entering the start or the end of the day, the caller needs to enter the time in 24 hour format; it will change the start of the first segment or the end of the last segment. This is useful if there are lunch breaks that will remain unchanged.
Linking a Service Flag to an Account
Once you have created a service flag, it can be used to redirect callers to a night service number or to an account that will just play a message (e.g., a night message indicating that you are closed).
Night Service
To redirect callers to a night service number, use the Service Flag settings from within the account (e.g., auto attendants, hunt groups, agent groups, and dial plans). In the example shown below, callers will be redirected to extension 501 during active service flag hours (external numbers are also permitted). Note : The same service flag can be used with multiple accounts at the same time.

You can use service flags to forward callers to multiple destinations depending on the time of day (i.e., different destinations for different shifts):

Message Only
To redirect callers to a night message, use the IVR link from the auto attendant account. From this link, you can provide callers with a single message or multiple messages. Create the necessary service flags, then record the required greetings for each of the service flags using the *98 star code . The audio files are listed under Current File:
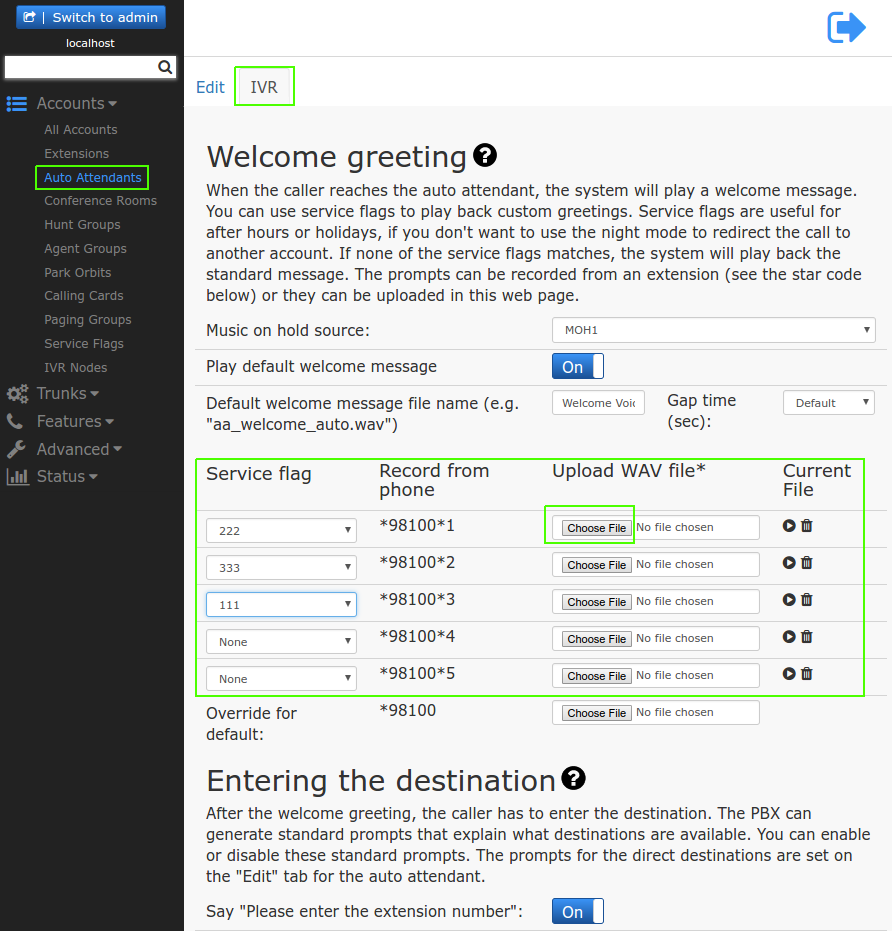
Star Codes
Star codes are used a short dial codes that can be initiated from any handset* to carry out an action.
*Please note that some codes will require the user to have the correct permissions enabled on their account. e.g the ability to listen into calls
The star codes can be found in under the Advanced tab within your Elite Voice user portal and list all available codes and their functions.
These can be changed by the admin but care should be taken when doing so to not duplicate any codes used elsewhere.
The most common used codes will likely be agent login/logout and record new greeting.
Buttons
Also within the Advanced tab is a buttons section.
Within here you can create a new button template. This is especially useful if all your users:
- use the same model handset
- require all the same button configuration
Once you have added a new template you can select the edit pencil to begin programming the buttons.
Firstly you will need to select which model of device the template is for.
Once you have selected this you can click the Add button which will generate a standard template below based on the model you have selected.
From here it is just a question of choosing the button type and its parameter.
Once completed you can save the template which will then become available for use under each users own buttons menu within their extensions configuration.
Buttons CSV
If you have created a template for your model of handset but wish to add button configuration on mass and save time entering manually within the portal you can click the Import CSV button.
Much like the Address book CSV (below) you can use a downloadable template we have created here that will guide you through entering all your configuration.
Once populated the far right column on the template will convert your data entries into CSV values. you can then copy all the data from these cells at once and paste them into the blank text box that appears on screen when clicking the Import CSV button.
Address Book
If you have provided us with your public IP address* you can take advantage of the domain address book
*Please note your public IP address must be static to ensure internet blips or outages do not cause a change in IP address. If your connectivity is held with Elite Group IT then you will be provided with a static IP free of charge.
Adding Entries
There are 2 ways you can add entries to this address book:
- Manually add entries one at a time using the web portal
- upload a pre populated CSV file of all your contacts
Manually Adding Address Book Entries
To manually add entries to your address book simply click the settings tab from the left hand menu of your Elite Voice portal and select Address Book.
From here you will see you can click the Add button and will be presented with a pop up window where you can populate the information for your contact followed by clicking the Create button then repeating the process for the remaining entries.
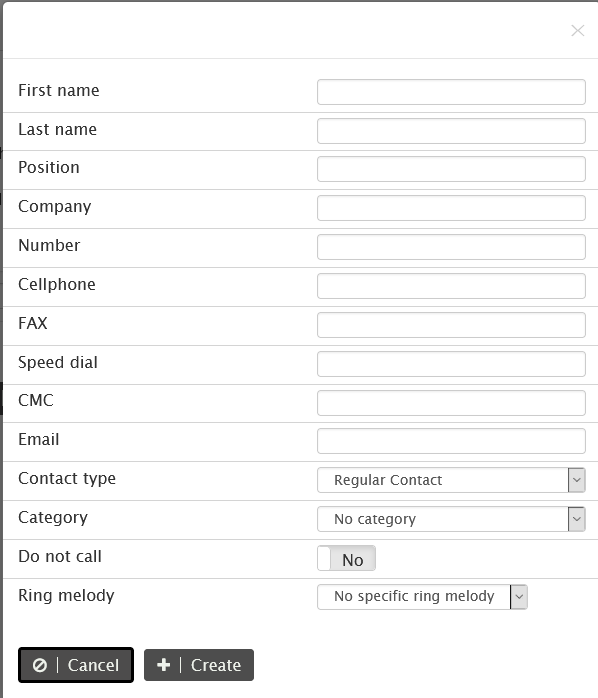
Adding Via CSV upload
The easiest way to populate your domain address book is through the use of a CSV (comma separated value) document.
We have developed and uploaded a downloadable spreadsheet HERE that you can populate and then copy onto your Elite Voice Address Book with ease.
First download the excel sheet
Once downloaded populate the address book details section with the information you wish to populate onto your phone system.
Once populated copy all the cells in the output field that are seperated by commas as shown below
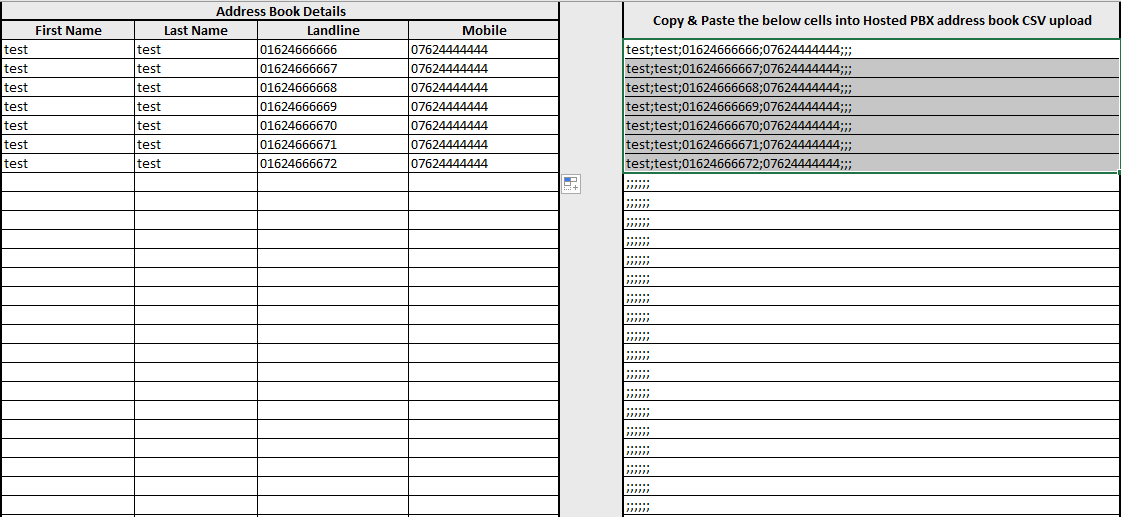
You can now click the +CSV button on the Elite Voice Address Book page.
Paste your contents into the blank box labelled content as shown below then click create
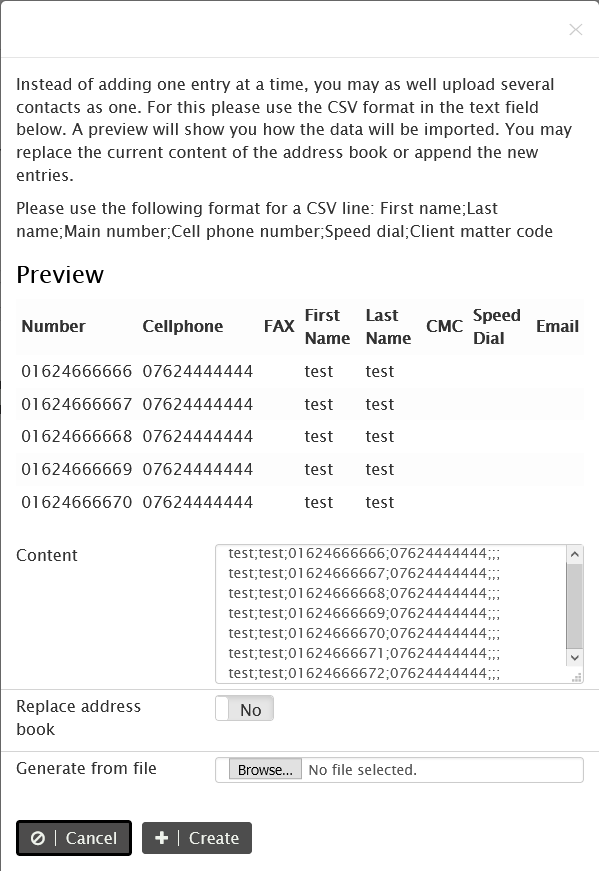
This will then populate your address book with all the entries.
If you need to update the address book with new entries you can simply use the template to add new addresses then replace the contents with the new details.
IMPORTANT: ensure the replace address book slider is set to NO so this new list is added to the existing and does not replace it completely.