SNOM FAQ
SNOM Common Questions & Functions
For A downloadable version click HERE
We have collated the most frequently asked questions raised by users of the Elite Voice platform and included them in this article so that users of our handsets can easily identify, Use and Administer functions and features of the SNOM handsets.
Key Functions
Your Snom handset comes with multiple keys and can be a little confusing at times. The below will guide you through each key and its function. The below is taken from our Standard Snom handset (D717) higher spec models have more Smart Label keys available but the operational buttons remain the same.
1. DND (Do not Disturb) pressing this button will enter the extension into an unavailable state. Calls can still be made from the handset but calls to it will go straight to voicemail as standard.
2. Mailbox – This button is configured to call the extensions mailbox where you can playback your messages
3. Smart Keys – Can be programmed on the user portal to users preferences e.g speed dial.
4. Function keys – Will change based upon state of phone e.g off a call will have directory, history, settings etc. On a call will have “transfer, hold etc”.
5. Directory – as standard programmed to local directory of handset, can be configured to be LDAP (domain directory pulled from system)
6. Settings – Here the user can put calls on forward and set other preferences such as ringtone
7. Transfer – pressing this button will initiate a transfer and will transfer after a number has been dialed to transfer to and tick button pressed.
8. Hold – used to place current call on hold, pressed again return you to the caller.
9. Headset – If using a headset pressing this button will default phone to use headset for all incoming/outgoing calls
10. Speaker – when pressed uses the handsets loud speaker function
11. Volume – used to control the volume of ringer or if in a call the volume of the call.
12. Mute – used to mute the microphone so caller cannot hear you.
13. Confirm button – used to confirm an action such as transfer or dial a number entered into phone.
14. Navigation -used to navigate menus
15. Cancel button – used to go back in the menu screen or cancel an action.
16. LED – This light will flash when ringing or stay permanently lit when the extension either has a missed call, unread voicemail or other notification to be acknowledged.
Making A Call
There are multiple ways to initiate a call from the SNOM handset:
- Handset
- Speaker Phone
- Headset
Handset Call
To make a call using the handset is simple.
- Simply dial the number you wish to call then lift the receiver which will trigger the phone into dialling whatever number has been entered.
- Lift the receiver where you will hear dial tone. Dial the number, there will be a brief period whilst it connects then dial tone will be heard once connected.
Headset
If using a headset simply dial the number you wish to call then press the headset button (labelled “9” on the button operations guide.
If the headset button is already illuminated you can simply dial the number and press the tick button (number 13 on button operations guide)
Speakerphone
Simply dial the number you wish to call and press the speakerphone button (number 10 on the button operations guide)
Placing a caller on Hold & Retrieving
To place a caller on hold press the pause button (button 8 on button operations). This will place the caller on hold. To retrieve the call simply press the button again to retrieve the call.
If you have multiple callers on hold you can retrieve one by using the directional keys on the handset (Button 14 on buttons operations) to highlight the caller you wish to retrieve then press the hold button to retrieve the call.
How do I do a transfer?
There are two kinds of transfer:
- Attended transfer – Where you place the caller on hold whilst you speak to the person they wish to speak with and then put them through.
- Blind Transfer – Where you put the person directly through to the person they wish to speak with and have no contact with that person yourself.
The below shows how to complete both scenarios.
Attended Transfer
With a single call on the phone.
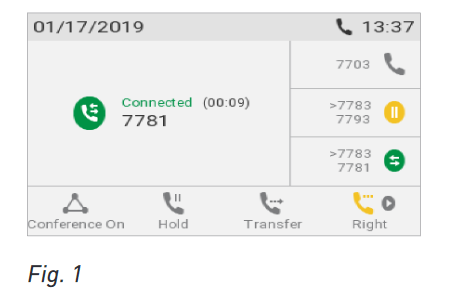
- Put the call on hold. In our example, the caller on hold is 7781 (Fig.1)
![]()
- Dial the number you want to transfer the call to and announce the call (Fig. 2)
- If the third party wants to accept the call, press the transfer key (Button 7) . The “holding 7781” screen appears again, and 7793 is shown as having been put on hold (Fig. 3).
- Press the tick (button 13) to complete the transfer. You may briefly see the messages “Disconnected 7781” and “Disconnected 7793”, indicating that the transfer was completed.
Blind Transfer
- With a call on the line (Fig. 7), press the transfer button (button 7). The dial screen will appear
- Dial the number (Fig. 8)
- Press the tick button (Button 13) . You may briefly see two “Disconnected” messages followed by the callee and caller’s name/number, indicating that the transfer was completed (Fig. 9)
![]()
Using the Address Book
There are two types of address book available on the SNOM.
- Local directory (programmed into the individual handset)
- External Directory or LDAP (pulls information from an address book stored on the elite voice control panel.
Typically, many Elite Voice customers opt for the External (LDAP) directory as this allows them one centralized location where updates can be made and all users of the PBX with a handset can access it. To see how to set this up please see the PBX user guide.
On the handset when powered up you may notice you have a directory button mapped to one of the function keys (4 on button operations). This is typically your LDAP directory.
You will also notice an address book button (5 on button operations) this is typically the local address book where users can configure their own private address book.
Local Address Book
When pressed this will take you to a search screen. You will also notice an emblem displayed above one of the function keys that looks like a person with a + emblem above their head.
Pressing this will allow you to add a directory entry using the buttons on the phones dial pad.
Simply follow the instructions on screen entering the relevant information as you go which will add your new entry into your local phone book.
External Directory (LDAP)
Before any entries can be viewed you need to ensure the following
- The internet connection providing the handset with connectivity has a static public IP address.
- You have provided this address to Elite Group IT Engineers to add to the Firewall to allow access to the LDAP directory.
Once we have been provided with this information, the LDAP directory you have created using the PBX user guide will be visible from any handset registered using the public IP provided.
For external directory population it is easier to load a directory into the PBX from a .csv file.
Within our knowledge base is a downloadable excel sheet that you can populate with your entries then copy and paste the CSV format into the address book creation within the Elite Voice control panel.
Conference call
You can set up a conference bridge for a maximum of 3 participants (not including yourself) directly on the Snom handset. This is useful for joining participants without the need for a conference room set up on the Elite Voice platform itself.
Initiating the conference
- Call the first intended participant and put him or her on hold
- Call the second intended participant.
Press the Conference On Button to start the conference.
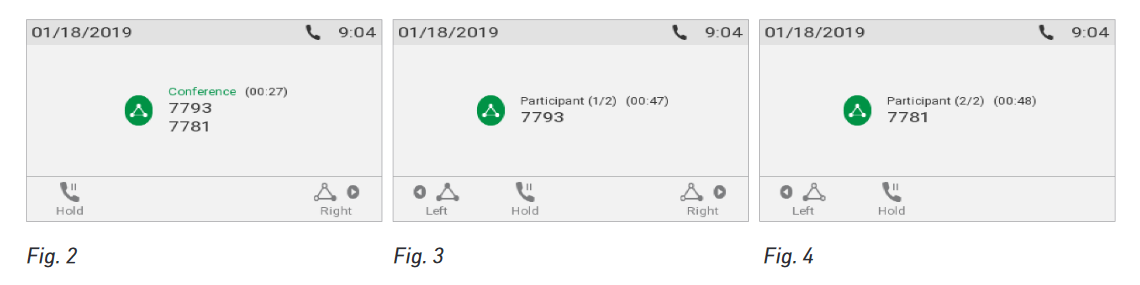
Conference screen Navigation
Your input on the phone’s keys will affect the caller/callee(s) or the entire conference shown in the contact area of the display. Example: A conference with three participants, including yourself.
After you have pressed the conference on button (Fig. 1) to start the conference, the names, if available, and/or phone numbers of the other participants are shown on-screen (Fig. 2 – 4). Fig. 2 shows the conference screen, i.e. all of your conference partners while Fig. 3 and 4 show the screens for individual participants.